This content was published: November 12, 2018. Phone numbers, email addresses, and other information may have changed.
Using Grades tool effectively
Posted by Melany Budiman
In this blog post, I’d like to share new features and some best practice tips you can use in the Grades tool so you can use D2L Brightspace Grades tool more effectively.

New feature – Freeze names column
The first name and last name column is now frozen on the left side, to make it easy to view the grades when you scroll to the right. Student names are no longer repeated every few columns!
Grade exemption
Grade exemptions is used to prevent a grade item from being included in the calculation of a student’s final grade. However, you can’t exempt final calculated grade or final adjusted grade.
When and how you would use it?
For example: You have an assignment where your students can pick between 2 options: A. submitting the assignment or B. volunteering at a local shelter. Both options have their own instructions and requirements, also have their own grade item.
You would grade the students who submitted option A and put exempt on option B for those same students, and vice versa for the option B.
How to apply the grade exempt:
- Go to Grades from the navbar
- In the Enter Grades area, go to the grade item, click on the drop-down arrow and select Grade All
- Check the box next to the student’s name and click Exempt at the top of the list. Click Save and Close.
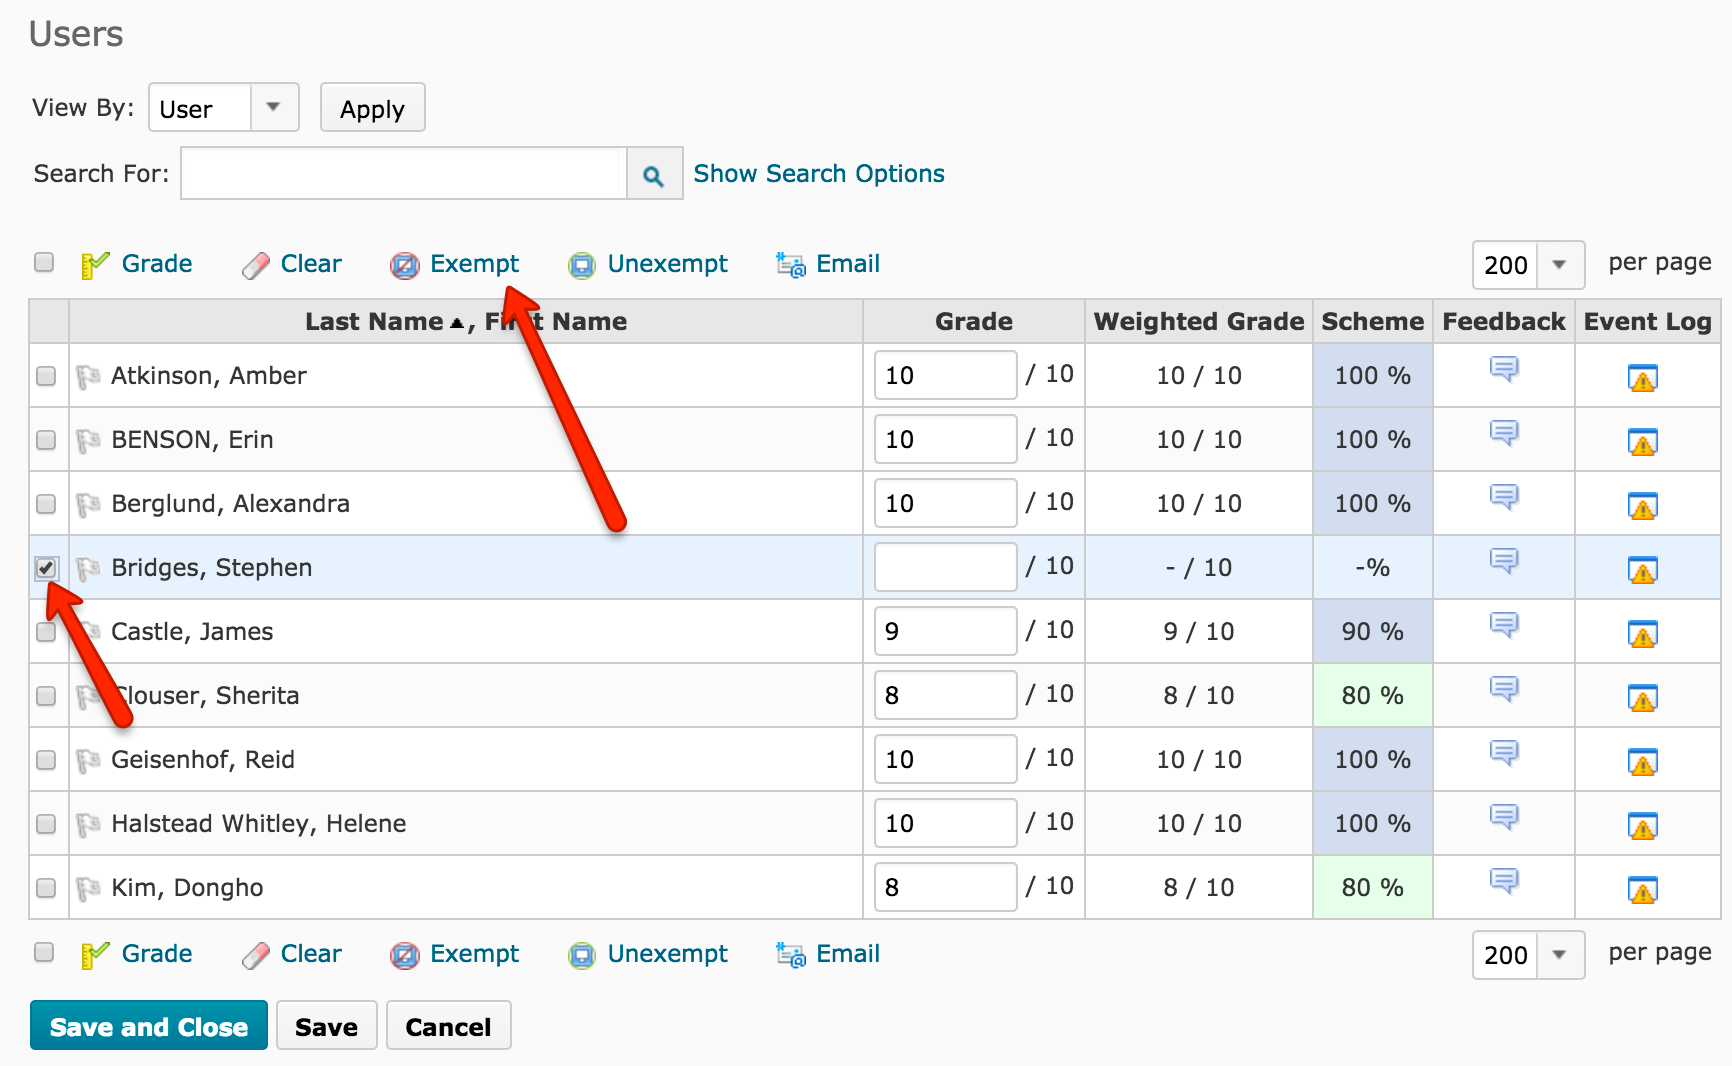
When you exempt a grade item, the total grade will be minus that grade item total for the students who you set exempt. For more information, you can watch the video tutorial on creating grade exceptions.

Other useful features
You may already use or familiar with these things in the Grades tool, but not completely understand what it’s for or how to use it.
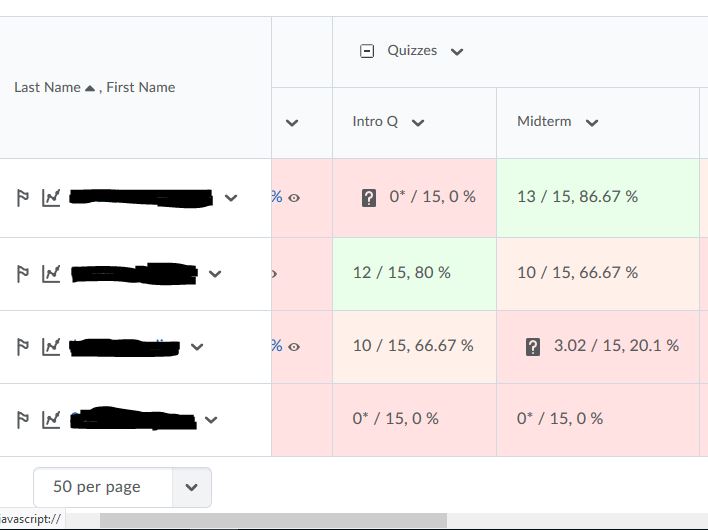
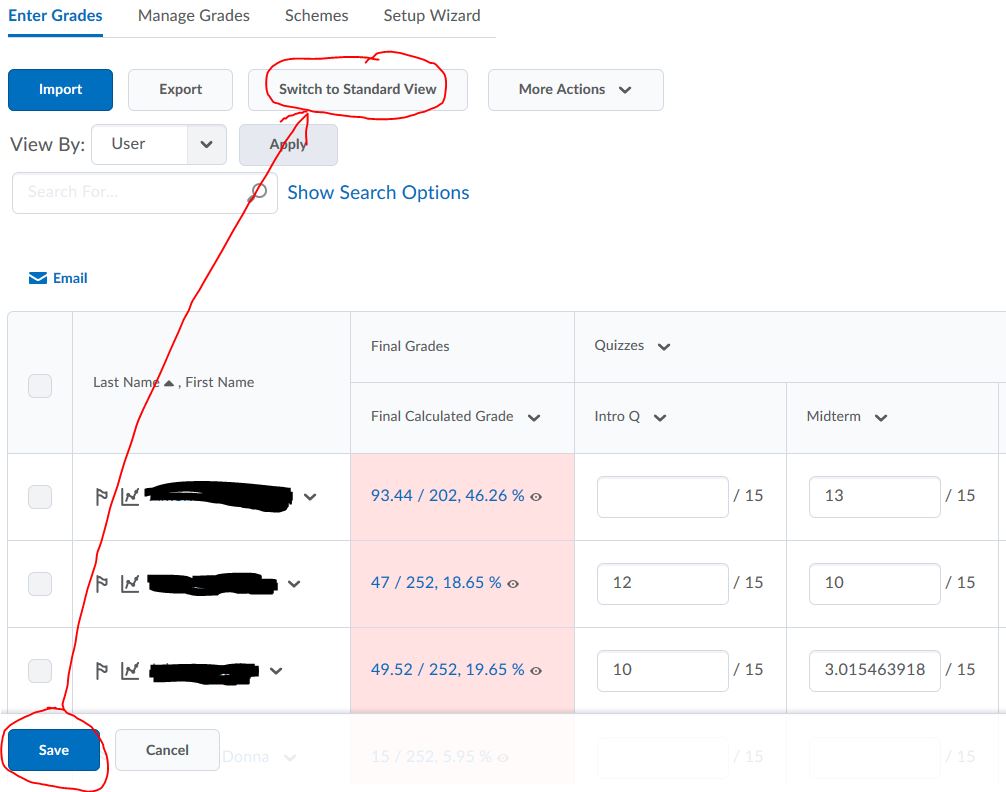
Spreadsheet vs standard view
This is one of many ways to enter grade for your students. You can quickly enter the points inside the boxes under each grade items. Unfortunately, you can’t leave any feedback to your students using this method.
 Best practice tip!
Make sure to Save and when you’re done, and “always click Switch to Standard view to lock the grades,” so that you don’t accidentally change or delete the grade you had previously entered.
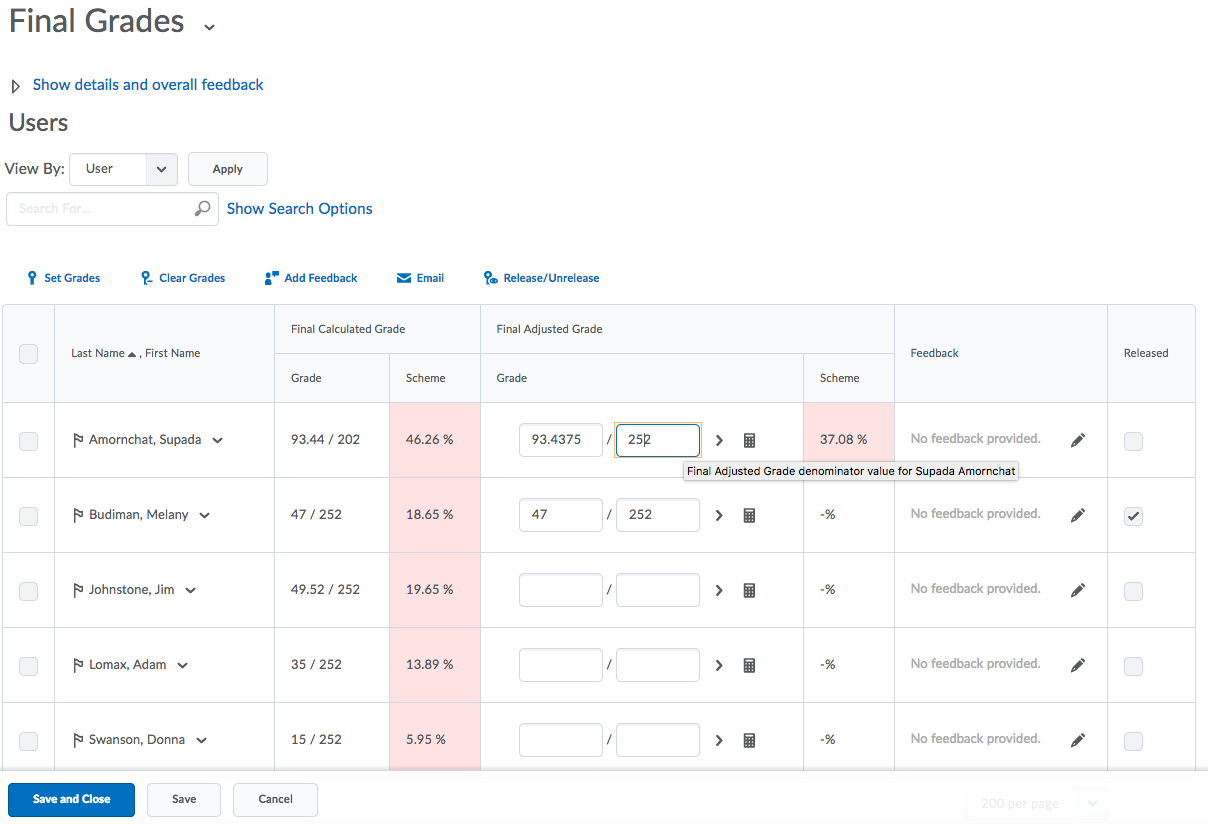
Calculated vs. adjusted final grade
I always suggest you choose Calculated Final Grade first, then towards the end of the term, you can switch it to Adjusted Final Grade (In Grades, click Settings → Calculation Options tab, under Final Grade Released. Click the Save button, and the Close button.)
Why you ask? Using calculated final grade is simple because d2l will automatically add up the grade and populate the column. The calculated final grade, simply means that “if class were to stop tomorrow – this would be your score in the class (without a curve – aka adjustment).
Using the adjusted grade setting is like having to curve the scores all the time and you will need to transfer the grade from the calculated to adjusted all the time. It can be a tedious chore, especially if you already release the final grade for your students.
Name vs short name
You would use meaningful name to label the grade item where your students can see their own grades. If you have a lot of grade items, you have to scroll to the right a long time. So, it’s best to also add the short name to label your grade item. Don’t worry! Your students will only see the full name and not short name of the grade item when they view their own grade.
For example:
Grade item name: Assignment 1 – Essay Response to life stories
Short name: A1
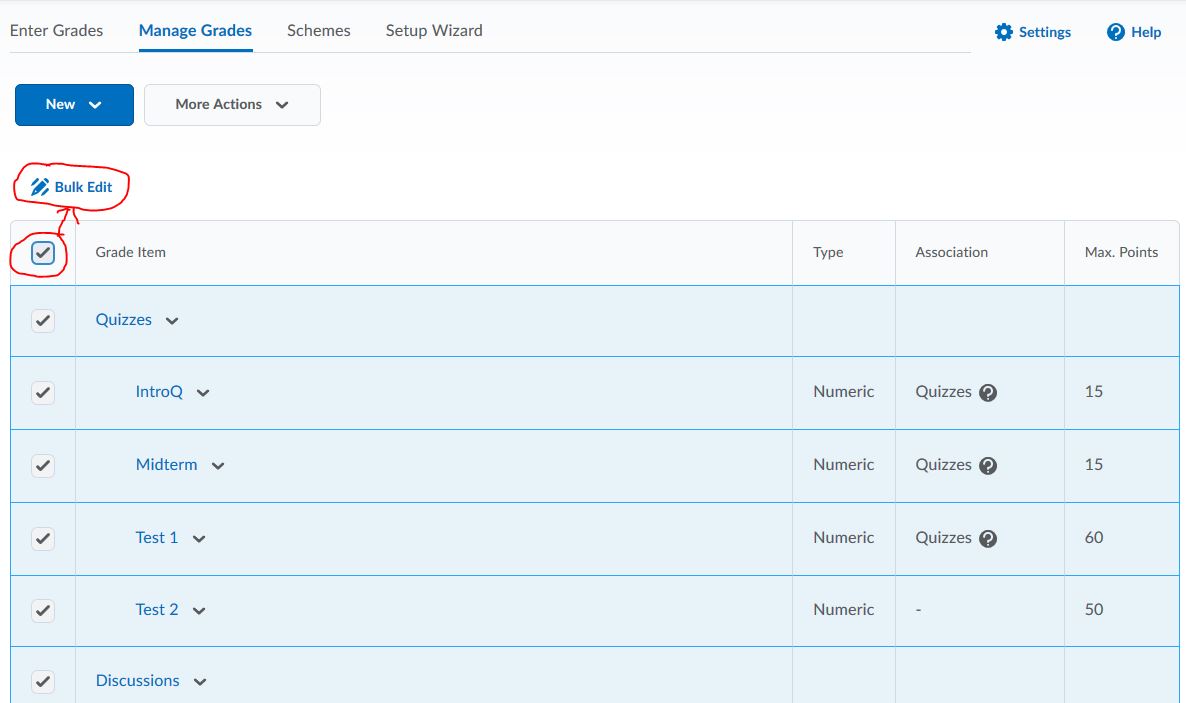
Bulk edit in Manage Grades
This is where you can quickly make changes to all the grade categories and grade items in one spot.
- Go to Manage Grades, check the box at the very top next to the heading “Grade Item” to select everything on the list and click Bulk Edit.
- Make your changes here, such as Name, Short Name, Max Points, checkbox for Bonus, checkbox for Can Exceed, Grade Scheme, and Category.
- Click the Save button.
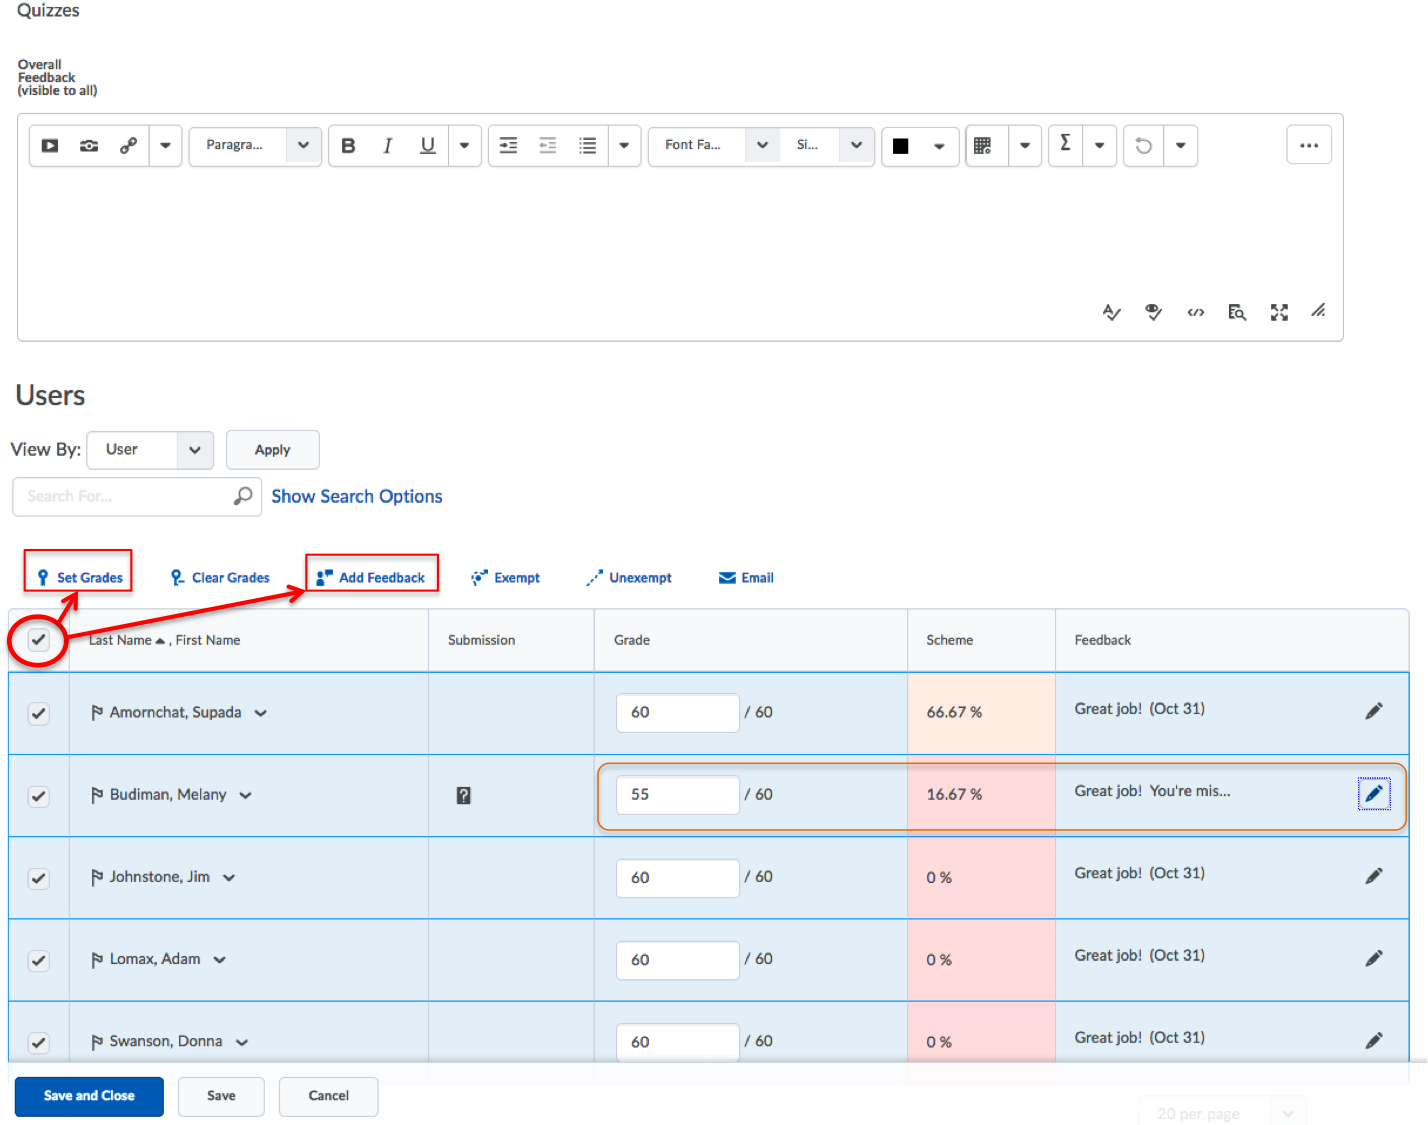
Quickly enter same grades and feedback for all students
You can only perform this for one grade item!
To enter the same grades for all students:
- Click the drop-down arrow next to the grade item’s name and choose Grade All.
- Check the box next to the top row header to select everyone on the list
- Click Set Grades and enter the point in the Grade box.
- Click the Save button.
To add the same feedback for all students:
- Make sure you still have everyone selected on the list, click Add Feedback. If not, follow step 2 above to enter the same grades for all students.
- Write your feedback in the feedback box. Make sure when you write the feedback, it is what you want everyone to see, such as date when you post the grade. Unfortunately there’s no undo button to remove all the feedback to the students once you did it, so you will have to update the feedback entry individually.
- Click the Save button.
You can still make changes to the grade and feedback area for a specific student. Click Save and Close button when you’re done.
Best practice tip!
You can put the date when you post the grade & generic feedback for the students. My students sometimes ask me why their grade haven’t been updated since I let them revise their assignments to get full credit. I can go back to the feedback and note when was the last time I updated their grade and post my new one with the new date as well. :)
Still have questions?

Don’t worry, if you still have any questions or need more guidance, contact the Online Faculty Helpdesk (email dlhelp@pcc.edu), 971-722-8227 or contact an Instructional Technology Specialist. They are there to help you every step of the way. Good luck!

The Grade Exemption feature is SO WONDERFUL — it will help avoid confusion for all the options I offer for assignments. I never would have figured this out on my own. Many thanks for the clear description and directions!
I’m glad Brightspace has released the ‘exemption’ tool. However, just as an FYI, by using adjusted grades, you could effectively do that as well – you could select which items and/or categories would apply and use that to set the grade.
Also, with adjusted grades, don’t forget that your friend is clicking on the “Grade” option (on the drop-down) and one of the options when you’re in the page is to Grade or Transfer all (from the calculated grade option). I don’t typically use this, but I have for one or two of my classes.
But thanks for this post!
I agree with Shirlee! “Exempt” is a very cool feature. Thank you!