Technical Guide: Zoom with ASL Interpretation
Making a successful Zoom meeting with American Sign Language (ASL) involves teamwork among hosts, co-hosts, interpreters, and participants. This guide aims to explain the technical choices, ways, and restrictions to assist your collaboration in organizing or recording Zoom meetings with ASL communication.
Quick Facts
- “Cloud Recordings” will not effectively capture meetings and the ASL interpreter. Accessible video recordings can only be made with the “Record to this computer” option
- Recordings cannot be captured by anyone who might share their screen or present.
- Important: the size of the Spotlight or Active Speakers is not 1:1 what the recorder sees during the meeting (see Adjusting the Size of the Interpreter).
- If you are the host and main presenter, you will need to coordinate with either the interpreter or a co-host to manage spotlights and record locally.
- If a meeting is being recorded, the meeting recorder will often manage the spotlights for the live meeting.
- Zoom ASL Interpretation features should only be used if the meeting is not being recorded and if stakeholders agree it can be used successfully.
- Local recording requires the use of the Zoom client application.
Pinning vs Spotlighting
This guide assumes the use of Spotlight over Pins. See the additional notes on using Pins at the end of the guide.
Spotlight
- The interpreter’s visibility is the same for all participants and is managed by hosts/co-hosts.
- Spotlight settings are reflected in local recordings
- More information in the Zoom Documentation for Spotlighting
Pin
- Every participant must manage their own access to the interpretation including the recorder.
- More information in the Zoom Documentation for Pinning
Step by Step
Meeting Host
Before the meeting
As a host, you will need to adjust or verify settings through the Zoom Web Portal.
- Sign in with your PCC credentials
- Enter “portlandcc” for the Company Domain in the SSO Sign On option
- Within the left column of the dashboard, locate and click “Meetings” to edit the meeting and add the interpreter(s) or recorders as co-hosts.
- Within the left column of the dashboard, locate and click “Settings”
The settings you should enable/verify are:
- Meeting > In Meeting (Basic) > Meeting Chat
- Verify Chat is turned on and that “Hosts and co-hosts” is selected for the default participant chat settings
- Alternatively “Everyone and anyone directly” will work, especially for smaller meetings
- Recording > Advanced Local Recording Settings
- Select “Hosts can give meeting participants permission to record locally”
Starting a meeting
If you are the host and will be presenting, meet with your Interpreters or co-host recorders in the meeting room early to prepare.
- In the Participants window verify the interpreter and recorders are co-hosts.
- In the Participants window select the three dots on the right of the participants recording the meeting and give permission to record locally.
- Share a screen to complete tests.
- Verify everyone has the views they need
- You may need to share that this is often done by selecting the View menu in the top right corner and selecting “Shared screen next to speaker”
- Coordinate with the recorder on when to start recording.
Co-Host/Record
Before the meeting
As a meeting recorder, you will need to adjust/verify settings in the Zoom Client application
- Open the Zoom client and click the gear icon in the top right corner.
- Click on Settings
- Verify adjusted settings in the General tab
- Enter full screen when starting or joining a meeting (optional)
- Always show meeting controls (optional)
- Verify or adjust settings in the Share Screen tab
- Window size when screen sharing: Maintain current size
- Side-by-side mode
- Verify or adjust settings in the Recording tab
- Record video during screen sharing
- Place video next to the shared screen in recording.
Starting a meeting
- Maximize (Full-Screen mode) your meeting if it is not already (optional).
- The recording will be the full resolution of your monitor independent of how you view the meeting.
- Verify with the host that you have co-host privileges.
- Verify that the host has given permission to record locally.
- Pressing record will start recording if you already have permission. Alternatively, permission will be requested if it has not been granted.
- Ask the presenter or host to share their screen to set up a recording layout.
- Verify “Side by side: Speaker” is selected as the view setting in the top right corner of the meeting.
- Open the “Participants” window and use the three dots button to Spotlight the presenter and the current interpreter (use “Add Spotlight” or “Remove Spotlight” only)
- The Participants pop-up window can remain open and will not be recorded.
- Spotlighting requires a user’s video to be on, the option will not appear otherwise.
- If the interpreter or presenter will change throughout the meeting, try practicing “remove spotlight” of the current interpreter and “add spotlight” for the new interpreter.
- The same operation would need to be performed if the presenter changes.
- Coordinate with the meeting host on when to start recording.
- Make sure to record “to this computer” and not “the cloud”.
- Important: the size of the Spotlight and Active Speaker will not be 1:1 what you see while recording. Please see Adjusting the Size of Interpreter.
Student/Participant
If there is no support for managed Spotlighting of the interpreters you can manage your own view with the use of Pinning.
- Message the host and ask that Multi-Pin is enabled for you.
- Locate the interpreter in the meeting window, or from the Participants window accessible from the controls.
- Once located, use their three dot menu to find “Pin”
- You can “Add Pin” to pin multiple video feeds with “Multi-Pin” enabled.
- Once a screen has been shared, find the “View” menu in the top right corner and select “Side by Side Speaker View” if necessary.
- The border between the speakers and screen share can be dragged to maximize the size of the Pinned (or Spotlighted) interpreters and speakers.
Suggestions for a successful session
Instructor suggestions:
- For Live Transcription:
- Contact Melanie.deleon@pcc.edu from Accessible Ed & Disability Resources to request a transcriber. (We use a service called TypeWell which provides a meaning-for-meaning transcript. We do use CART services when appropriate)
- Set up a session to practice this before students arrive and while technical assistance (like the Faculty Help Desk) is available.
- In a Zoom meeting that you are hosting click Closed Caption, located in the bottom control panel, and select Assign a participant to type.
- In the participants window, hover over your transcriber’s name and click More and Assign to type closed Caption
- “Re-state” math problems by typing them into the whiteboard or chat before completing the problem.
Student suggestions:
- Make arrangements with your instructor for a transcriber at least a few business days before the session.
- After entering/logging into the session, choose “Show Closed Captioning” (Ctrl/Cmd + F8) from the Collaborate Window menu, to open the captioning window. After it’s open, just wait for captioning to begin.
- Don’t close the transcribing window- you will lose the transcript history.
- Ask your instructor or the moderator of the session to Record the session. That will record all the captions, even if you closed the captioning window mid-session.
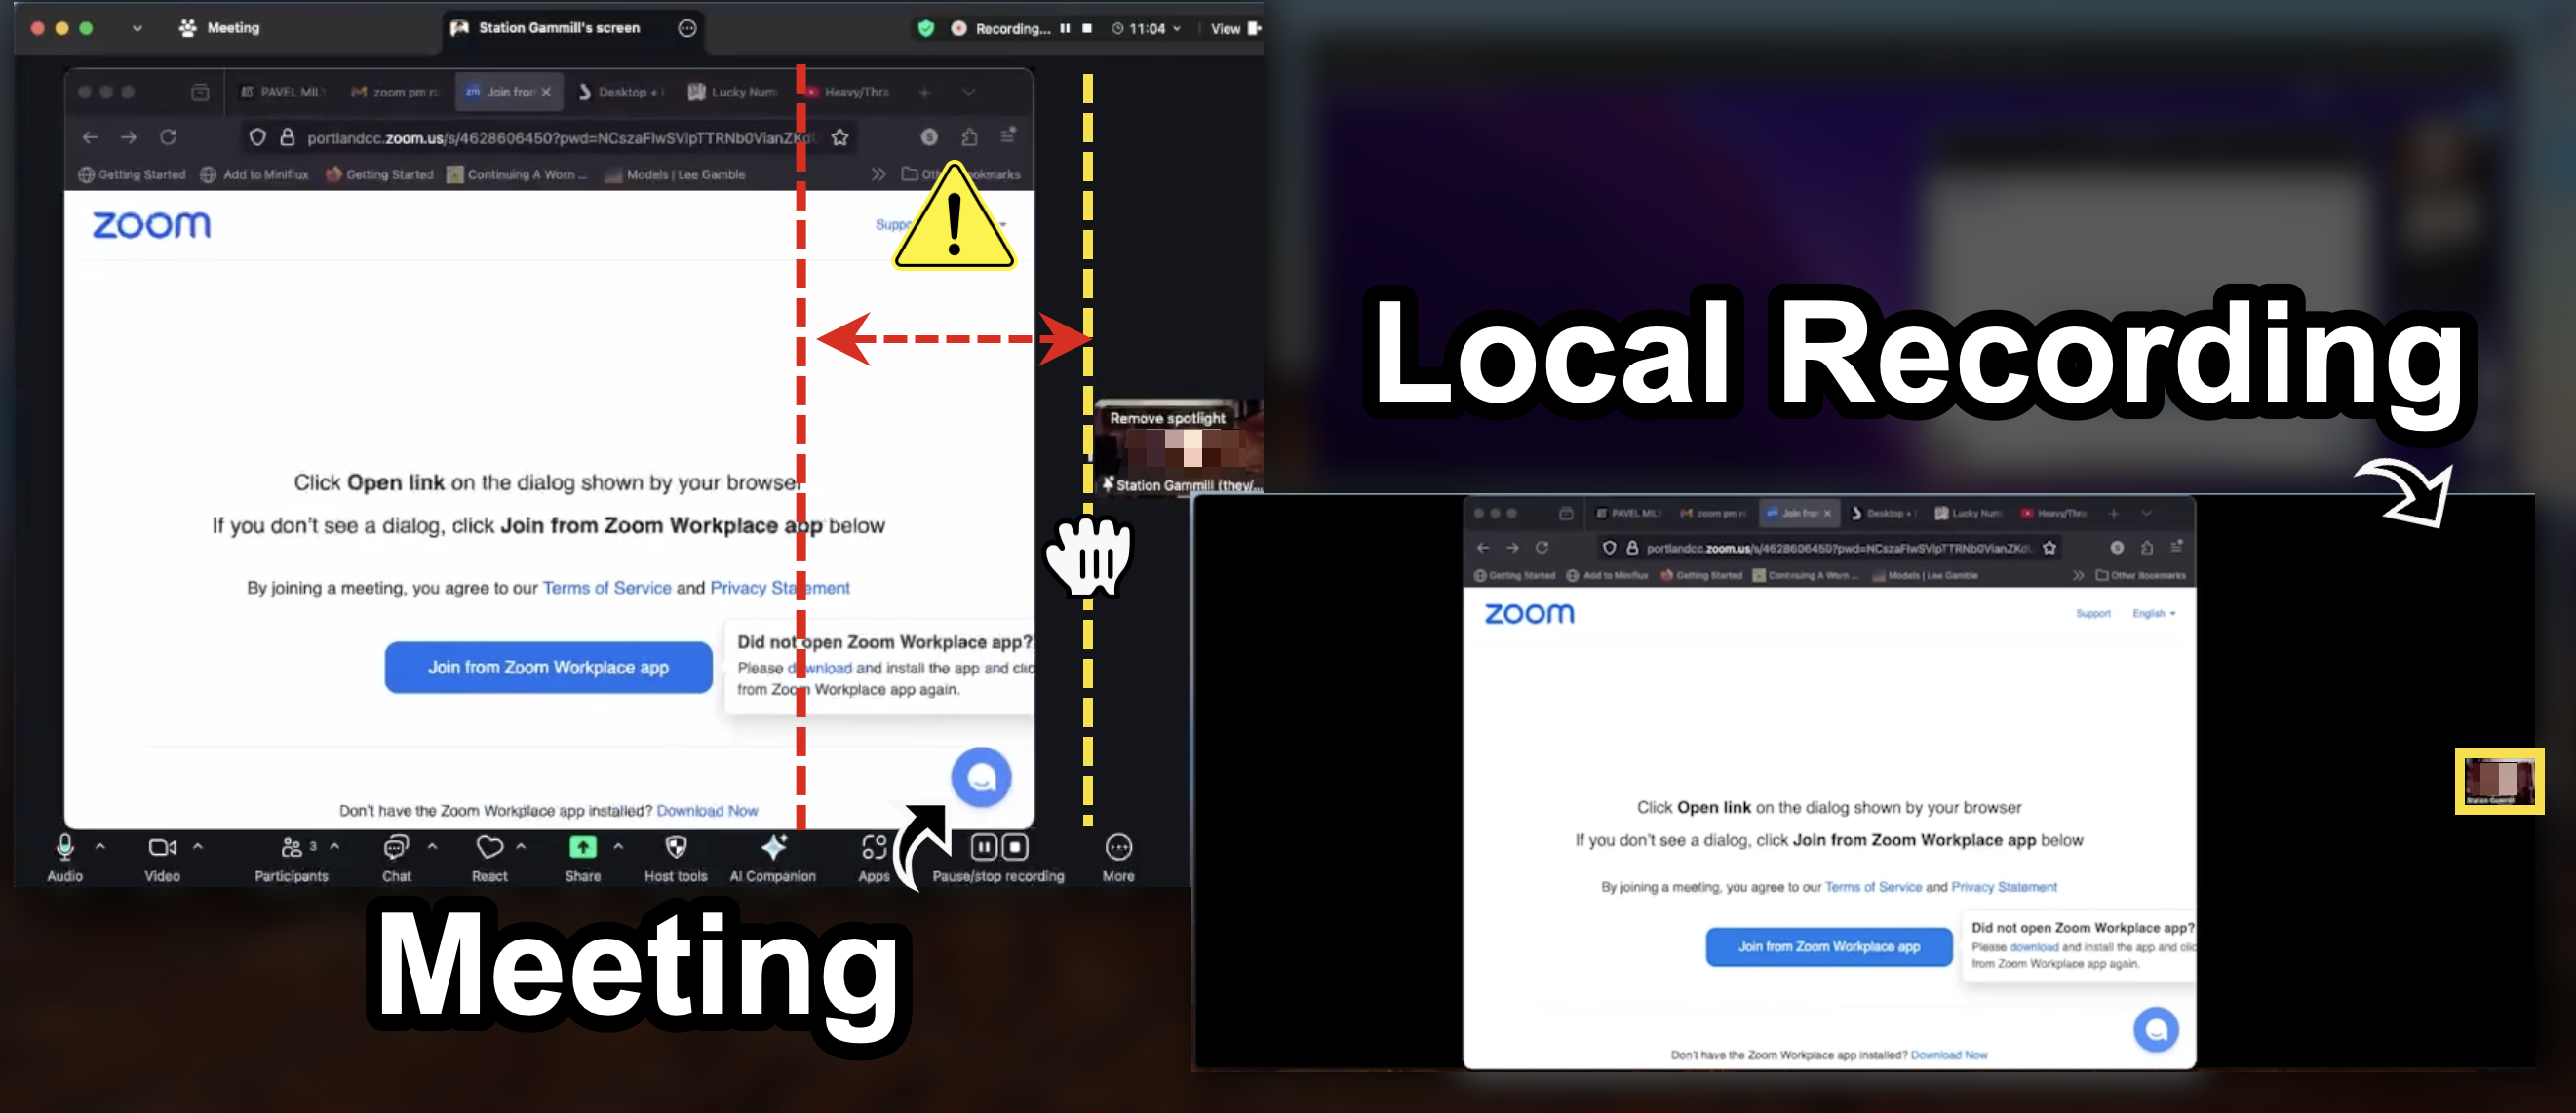
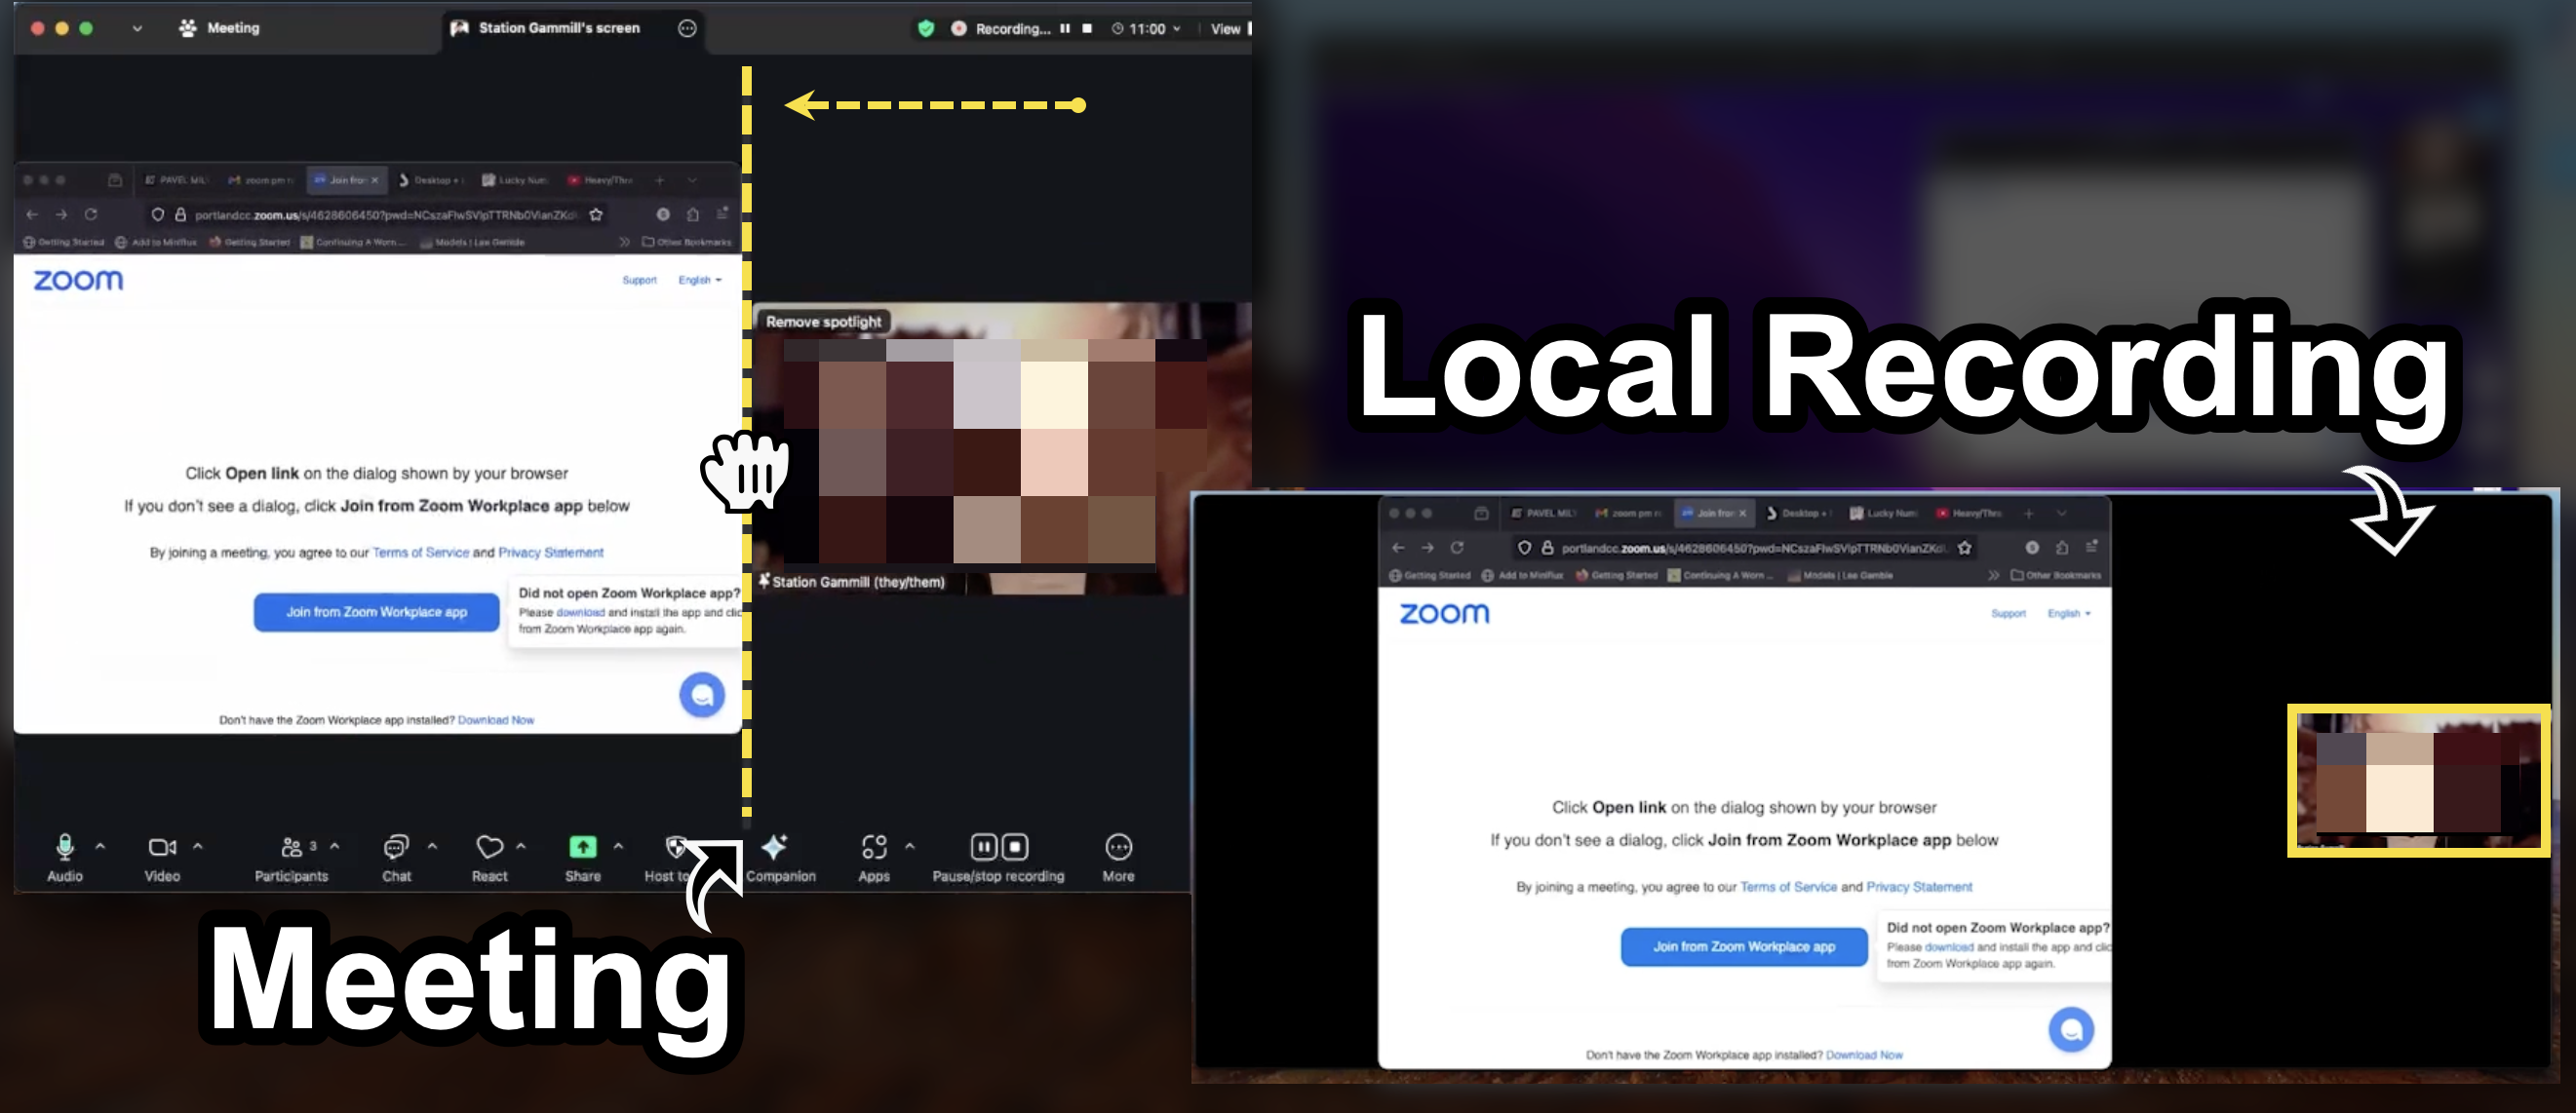
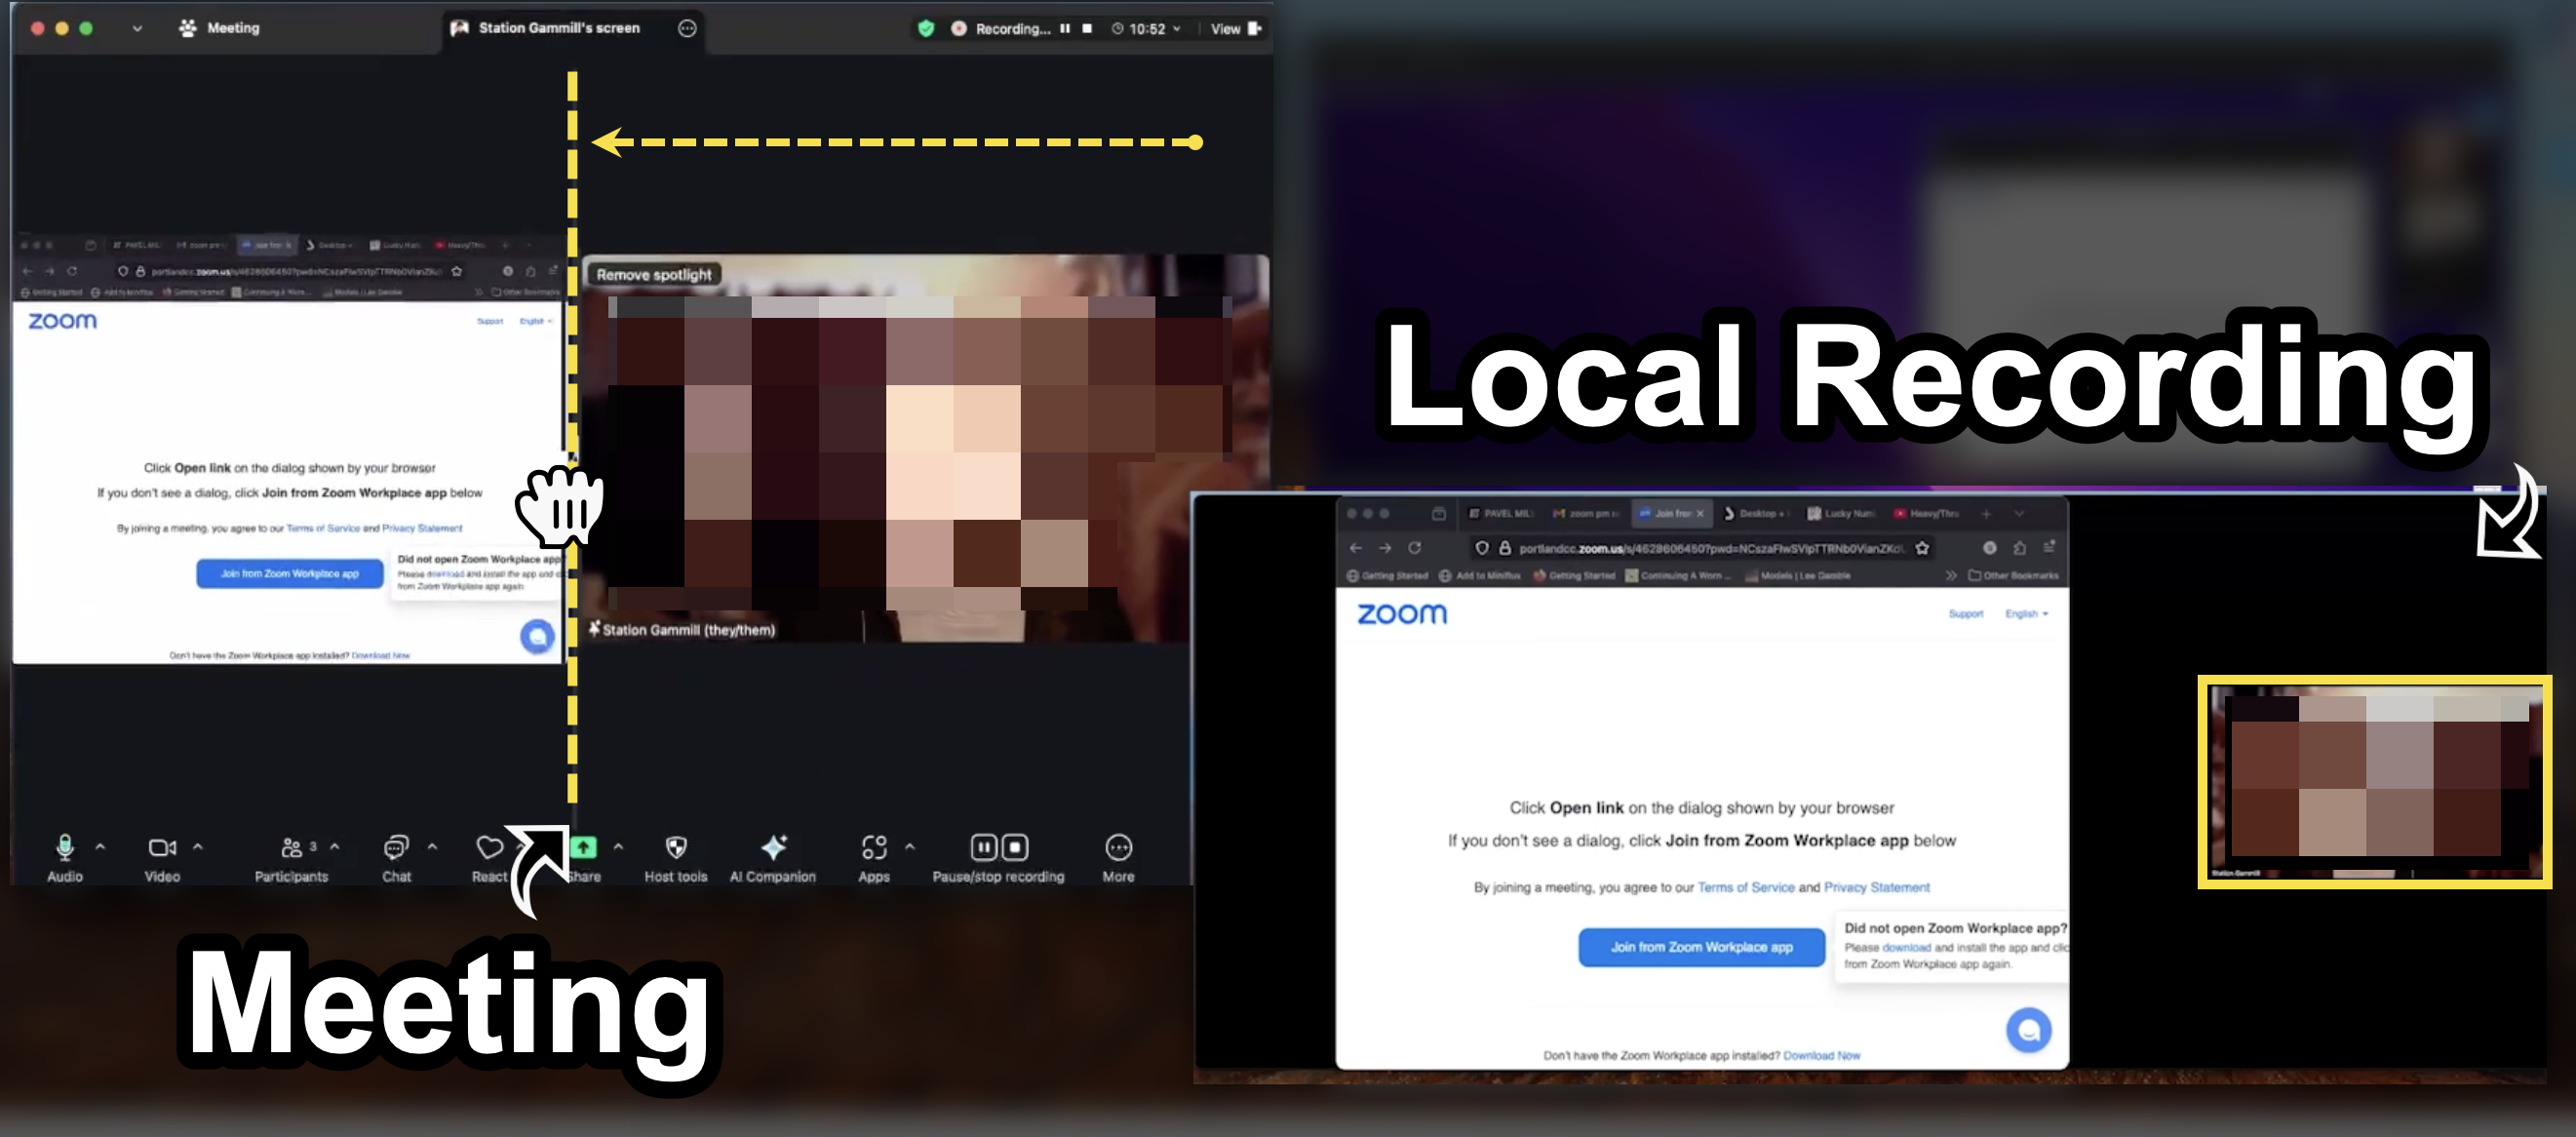
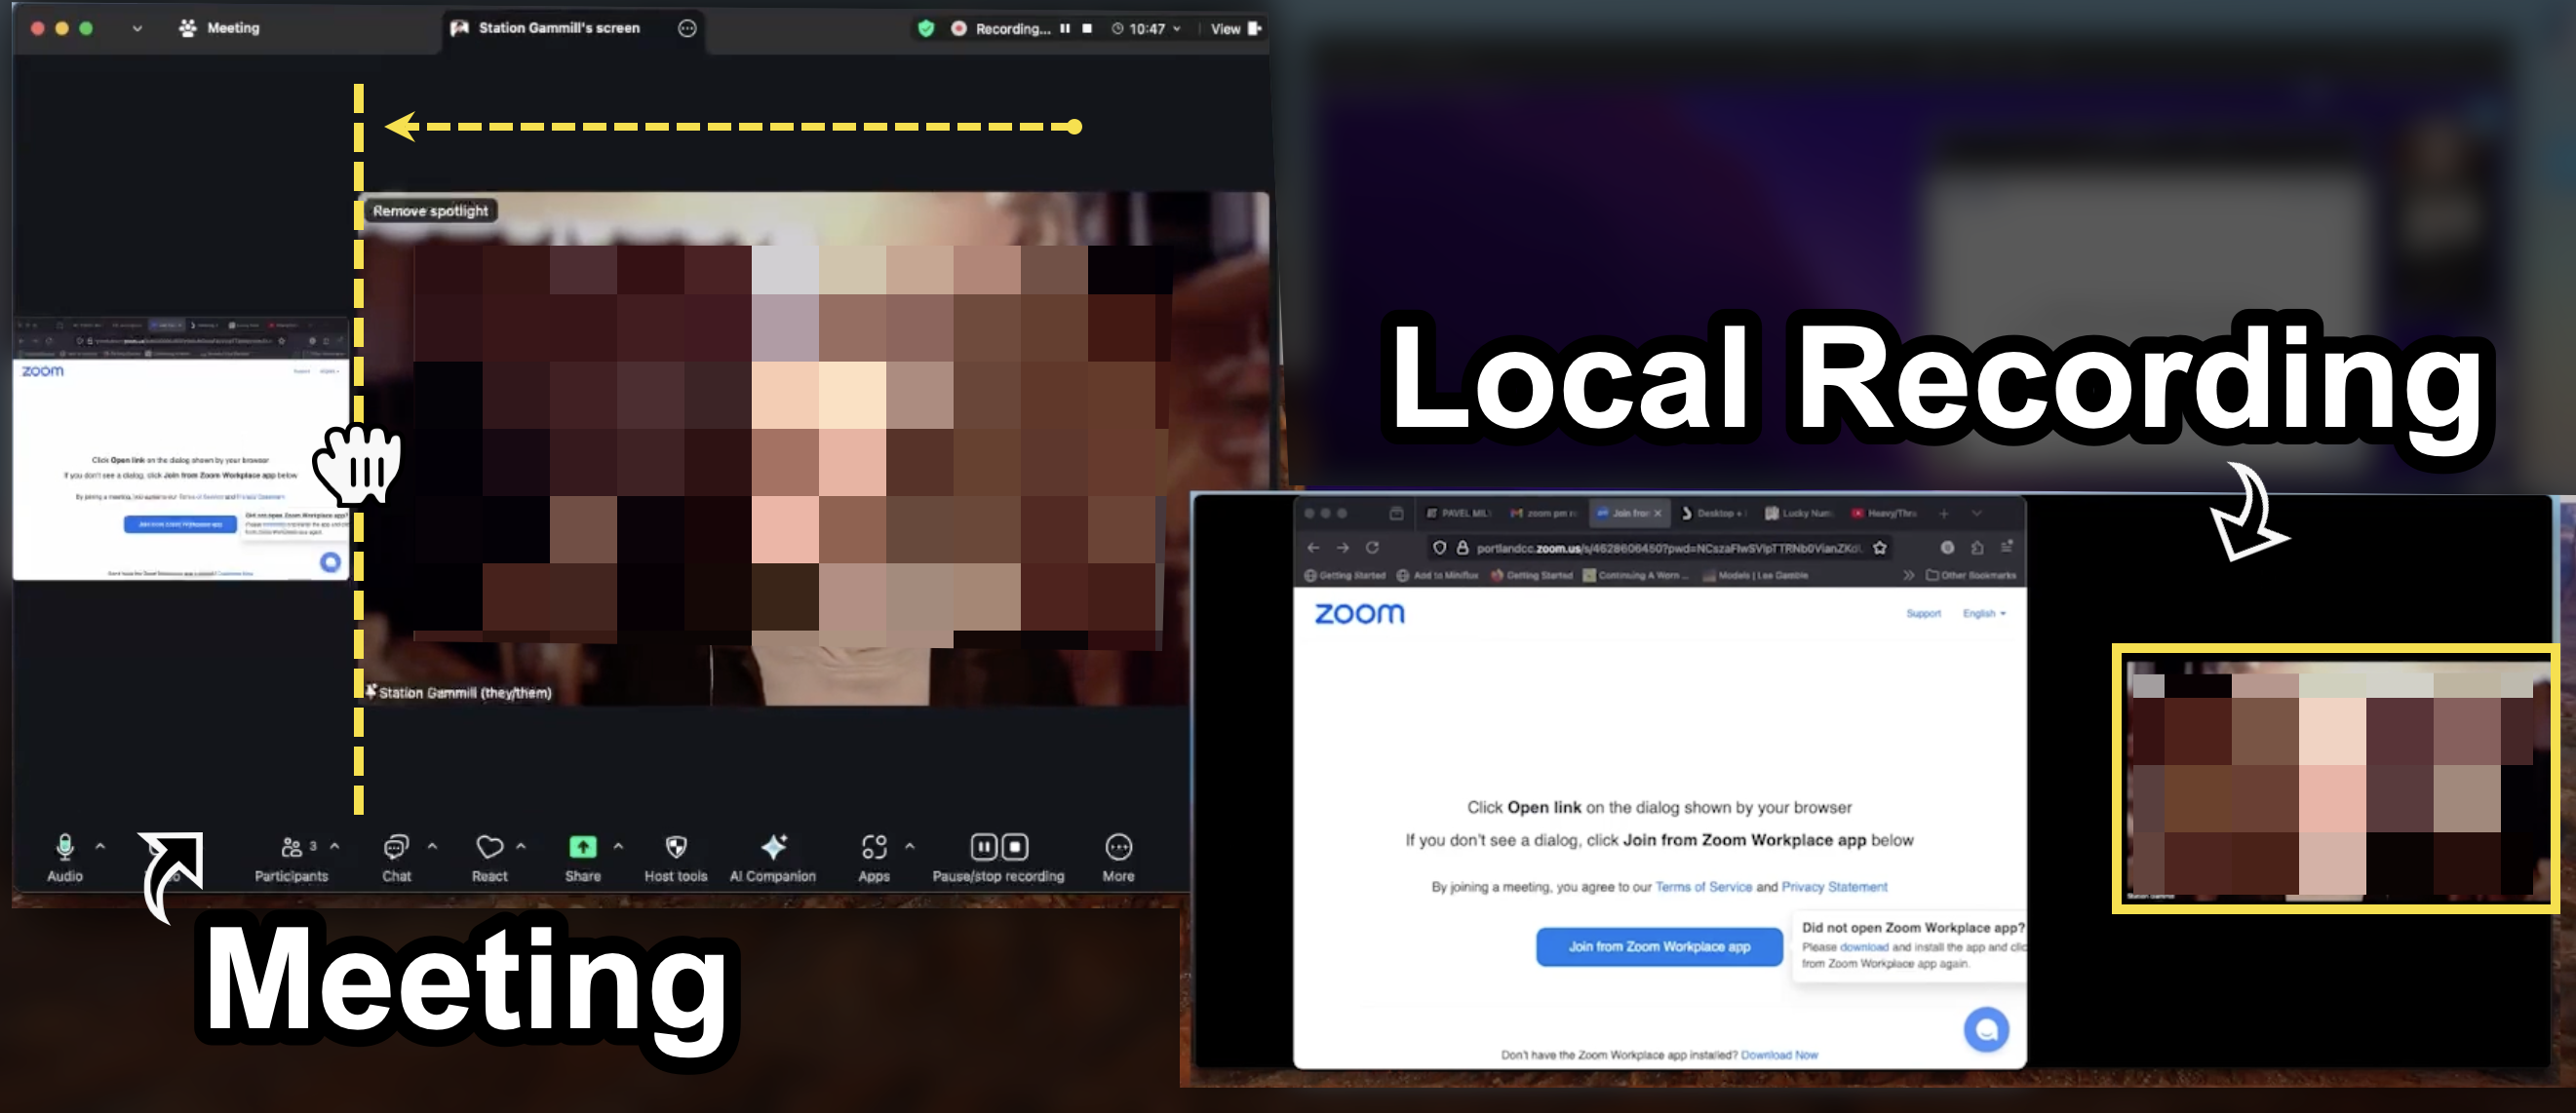
Adjusting the Size of the Interpreter and Speakers for Recording
In a meeting the size of the “Side-by-side: Speaker” view can be dragged horizontally to increase the size. This will affect the size in the recording as well. However, there are only a small number of possible sizes, and they do not match 1:1 with your view within the meeting. There seem to be at least four sizes that all other adjustments are “quantized” to. The best settings for a recording might seem a bit extreme within a meeting.
Extra Small (Default)
Even dragging the bar over 25% can still leave the recording size too small due to “quantization.”
Small
The second size starts further than you might expect, from about 25% to just under 50%
Medium
A good size is about halfway, where the height of the presentation and a single speaker just about match.
Large
The largest size can only be achieved at what seems to be an extreme setting within the meeting.
Additional Notes
Pinning vs Spotlighting
- If using Pins, the host will need to enable Multi-pin for anyone recording as well as participants that need access to ASL interpretation
- If using Pins, substitute “Pin” for “Spotlight” in the above Recording instructions
Breakout Rooms
- Pause recording before entering breakout rooms, use “resume recording” to continue after returning to the main room
- After breakout rooms, pinning and spotlighting have to be reassigned
- Coordinate between hosts, interpreters, and participants to reset Spotlight or Pin settings when returning from breakout rooms