
Zoom Guide for Instructor/Host
Important Notes
- If you run into any issues following these steps, please contact the Online Faculty Helpdesk (971-722-8227, Email: dlhelp@pcc.edu)
- Zoom is constantly updating its product. You can read their release notes for more information
- We recommend that you updated your Zoom Workplace once a week. Follow Option 3 to update your Zoom Workplace.
- You can also use the personal meeting room to practice or to create lecture recordings
- Zoom requires an instructor to be present in the room at all times as a Host, and you can add others as co-host
- If you’re teaching more than 1 class, you will need to create the zoom meeting inside the specific class and provide the name that you can easily identify, such as BA 101 MW vs. BA 101 TR Class Time. Otherwise, your students in another class won’t be able to access the zoom meeting and the students in the first class will have access to all the zoom meetings you created for all your classes (FERPA violation)
- If you teach the same classes and you are not doing crosslisting courses, It’s best if you copy the class content first before creating the Online Room meeting for each class.
Recording Live Session
If you plan to record your live class sessions, please include language in your syllabus that provides an explicit understanding to the student of your plan. You can advise them of their options to rename themselves, and to keep their audio and video muted during recordings. Also, during the session, before you begin the recording, please provide an additional notice that you are about to begin so they can make any adjustments they need.
Here is some sample text for you to use:
Note to students:
“Given students’ potentially limited access to the internet, I plan to record our sessions together for viewing later. These recordings will only be visible to those enrolled in this class, and students have the option for additional layers of privacy by renaming themselves in the Zoom room, muting their video, and muting their audio. If you have any concerns or questions, please let me know.”
Step 1: Adding the Zoom link to your D2L Brightspace Course Navbar
If you are using the PCC default navbar, Zoom will already appear there. Use the instructions below to add it
- Go to Course Admin
- Click on Navigation & Themes
- Click on the action menu for the Active Navbar and choose PCC Default Navbar and click the Apply button
Note: If you’re currently using a custom navbar, follow the instructions found at Creating, editing, and activating your navigation bar to manually add the Zoom Link. - Zoom should be listed on your course navbar now.
Step 2: Connect your D2L Brightspace account to Zoom (first-time user only)
- Click on the Zoom link created in Step 1
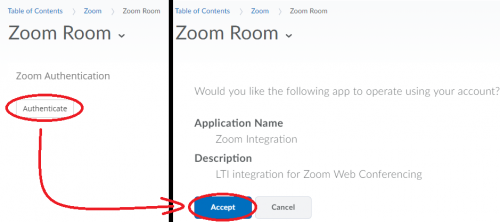
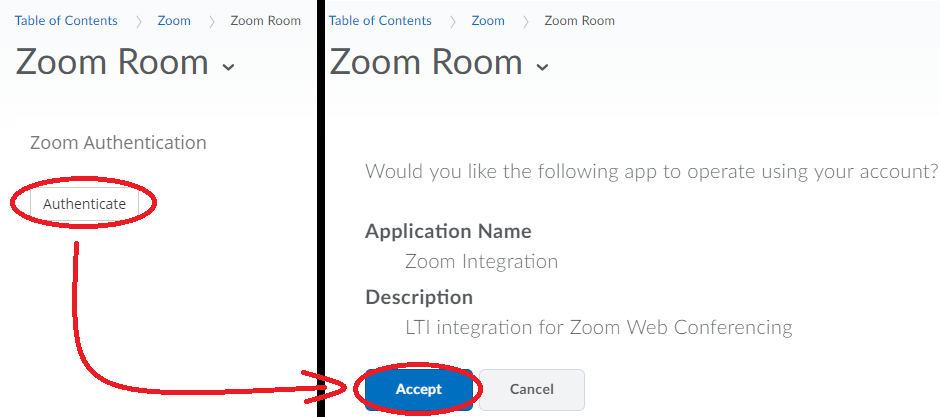
- If you are accessing Zoom for the first time, then you will be prompted to Authenticate and then Accept a confirmation to connect your D2L Brightspace account to Zoom. If you receive an error message when trying to access Zoom, please email dlhelp@pcc.edu
- You will receive an email to confirm your Zoom account. Check your PCC email and click to confirm Zoom account activation. If you still do not receive an email within a few hours, go to https://portlandcc.zoom.us and sign in using your PCC credentials. You should receive an email confirmation for your account. Go back to your D2l Brightspace class, and click on Zoom.
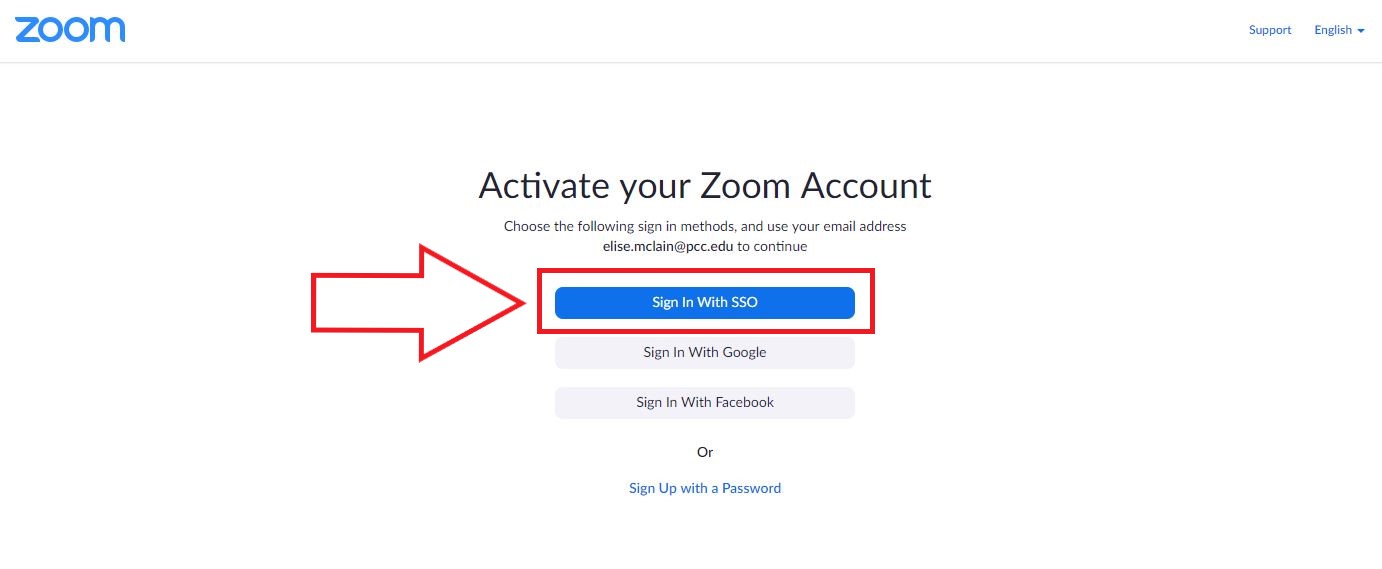
- When you install the zoom application, you may see this screen that asks you to sign in. Click on Sign in With SSO, enter portlandcc.zoom.us as the company name, and use your PCC credentials on the login screen that shows up next.
- Once you’re login, it will take you to the Zoom platform. You can close it and go back to your D2L Brightspace screen to continue
Step 3: Creating a Zoom Meeting Session as an Instructor/Host
Note:
- If you’re teaching more than 1 class, you will need to create the Zoom meeting inside the specific class and provide the name that you can easily identify, such as BA 101 MW vs. BA 101 TR Class Time. Otherwise, your students in another class won’t be able to access the Zoom meeting, and the students in the first class will have access to all the Zoom meetings you created for all your classes (FERPA violation)
- If you teach the same classes and are not cross-listing them, it’s best to copy the class content before creating the Online Room meeting for each class.
- Inside your Brightspace class, click Zoom. Once you have accessed Zoom, click Schedule a New Meeting from within your Zoom profile
- Enter a Topic for your Zoom meeting room
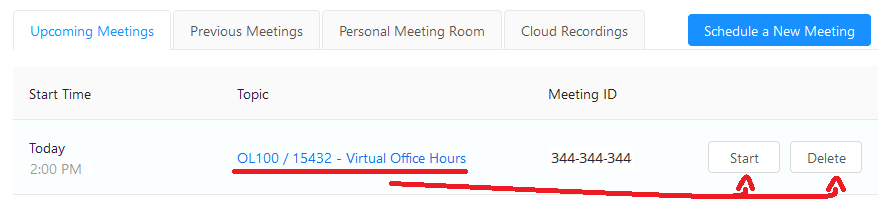
- If you have multiple course shells that are utilizing Zoom, then ensure that you include a means to identify one Zoom meeting room from another in the topic (e.g., OL100 / 15432 – Virtual Lecture Class)
- Edit the When section to set the Date and Time for the meeting room
- Enable the Recurring Meeting option if you plan to use this room at the same time each day/week/month. Set the End date using either [specific date] – Recommended, or after # of occurrences.
- Registration: leave the box unchecked – Recommended
- Security options:
- Require meeting password (Recommended for security) – Allows the instructor/host to set a password for the meeting room that students/participants would be prompted for when they try to join the meeting room using the URL or meeting ID. The password won’t appear if students join from Zoom in Brightspace.
- Enable waiting room (Recommended for security) – Zoom will place all attendees in the waiting room if the host is not yet in the session. Once the session starts, the host must admit attendees from the waiting room to the meeting.
- Uncheck the box for “Only authenticated users can join meetings.” Checking this box will limit the meeting to users who have a Zoom account.
- Video option: the Host and Participant on/off options tell Zoom whether to automatically turn the user’s webcam on or off when joining the meeting room (Recommended: Host set to on and Participant set to off). Participants can turn on their video later on when they’re ready.
- Audio option: set to Telephone and Computer Audio.
- The Meeting Options area holds advanced settings that you can enable or disable for your Zoom meeting room
- Enable join before host (Not Recommended) – Allows students/participants to join the meeting room before the instructor/host
- Students/Participants will be shown a “waiting for broadcast to begin” message if the Instructor/Host has not joined the meeting room at the time that they are trying to join
- The host will receive an email notification if someone is in the room
- Mute participants upon entry (Recommended) – Sets students/participants to mute when they join the meeting room
- Breakout Rooms pre-assign (Not Recommended) – you do not know who will attend your meeting in advance, and your students may not have their own Zoom account
- Enable focus mode when the meeting starts (Not Recommended)
- Enable additional data center regions for this meeting (Not Recommended)
- Enable join before host (Not Recommended) – Allows students/participants to join the meeting room before the instructor/host
- Alternative Hosts are used if you want to host the session together with someone else and assign them a co-host role. You can only add other PCC Zoom users. Learn about Host and Co-host controls in a meeting)
- To add, enter their PCC email address. Separate multiple emails by a comma.
- Click Save
- Once you have saved your meeting, you will be brought to a confirmation screen where you can verify your settings, get the join URL, and more.
- If you want to access your Zoom meeting room, click the Start this Meeting option
- If you made a mistake with the meeting room settings, then click the Edit this Meeting option
- If you would like to delete this room entirely, then you can use the Delete this Meeting option
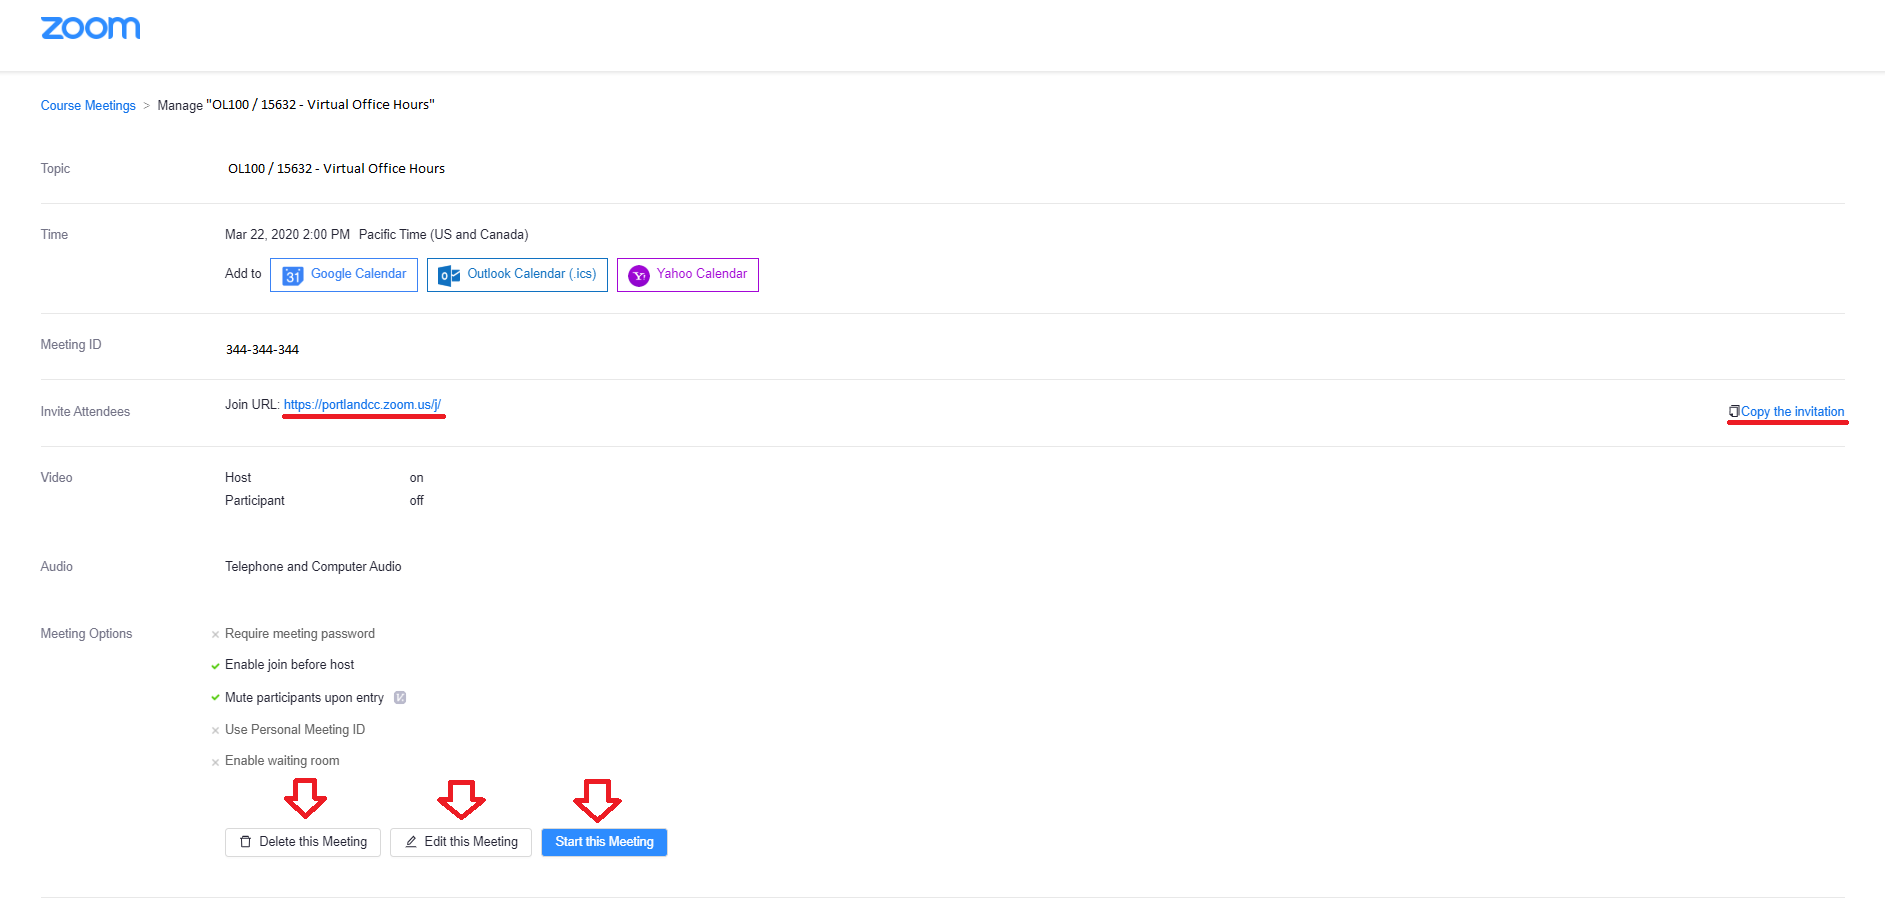
- You don’t need to send the meeting URL to your students. Students can access your scheduled meeting from the Calendar event on the Course Home or by clicking the Zoom link on the course navbar. You may send the meeting URL to a guest speaker who does not have access to your Brightspace class.
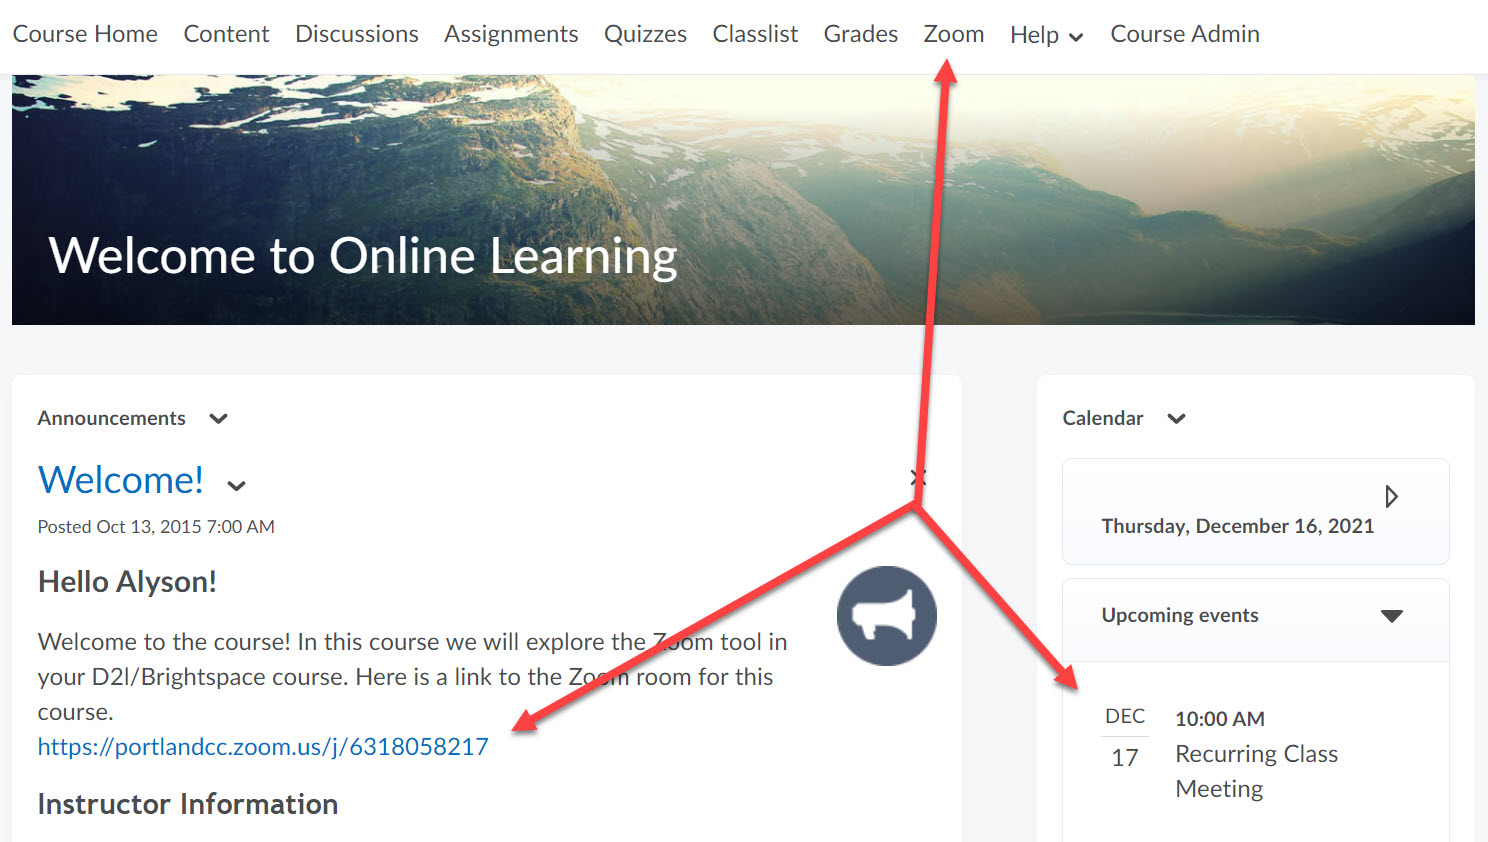
Note: You can find your future and past meeting rooms in the Upcoming and Previous Meeting tabs.
Step 4: Accessing Zoom
- You, as the instructor, will need to access the Zoom meeting via the Zoom link in the course navbar to be assigned the host role. If you join the meeting via the calendar event on the Course Home, you will be a participant and won’t have host control to lead the meeting.
If you teach multiple classes, you can check the box for “show course meetings scheduled by me” to filter meetings only for the class you are currently in.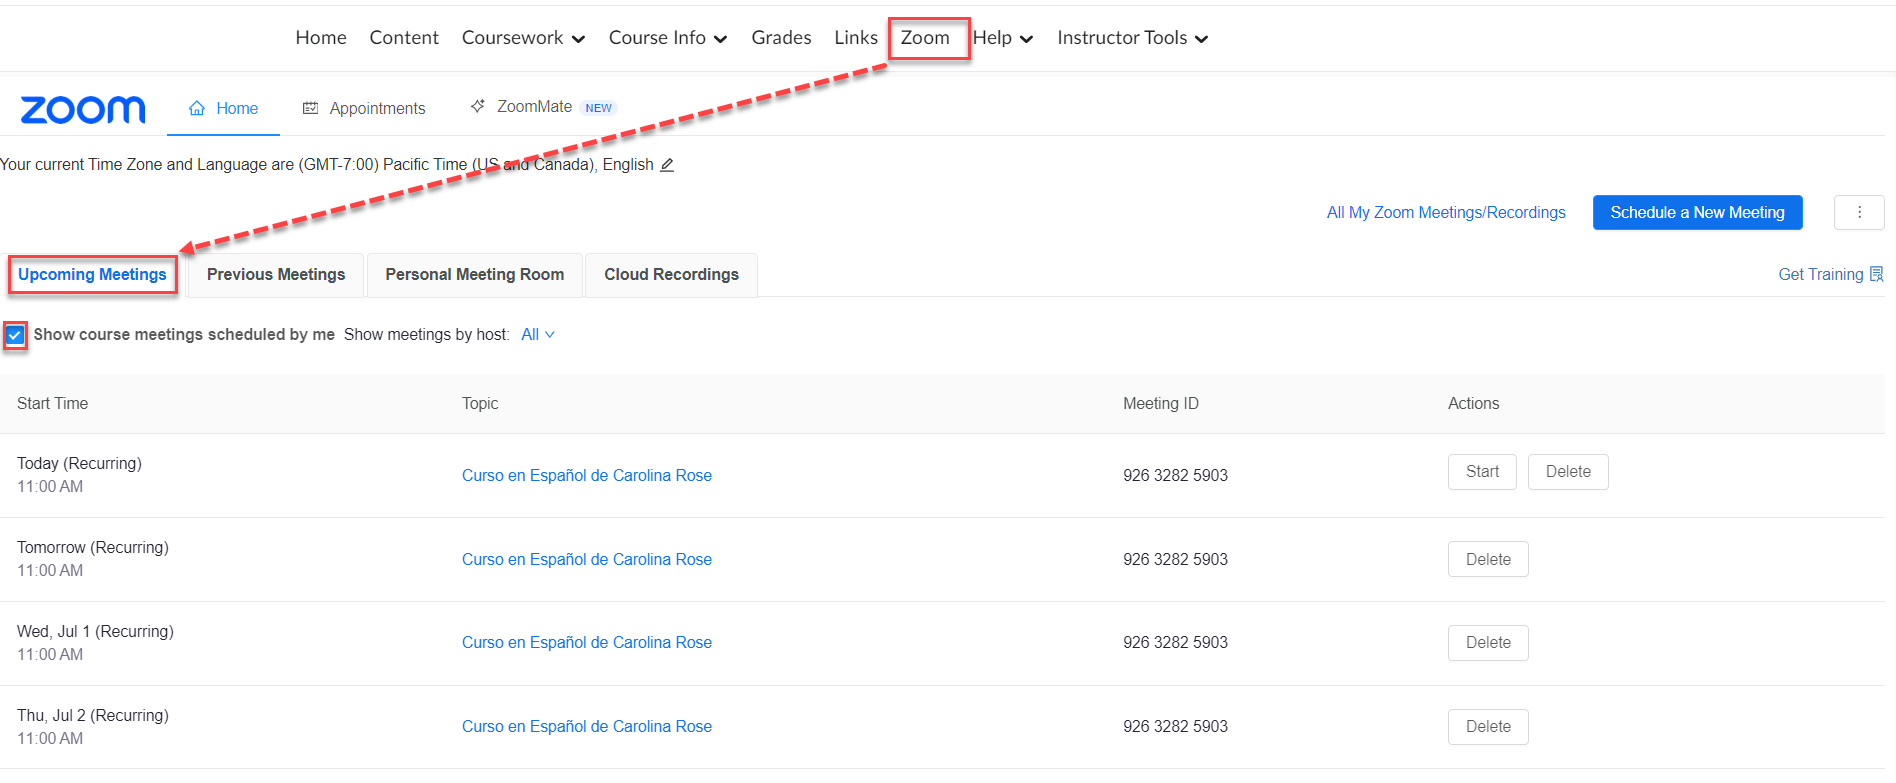
- Click the Start button next to the meeting you want to enter.
For a first-time user, when you click the link to start the meeting, you will be prompted to install the Zoom Workplace application. This applies to all first-time users (anyone who needs to access your meeting).
Note:
It is recommended that you host the meeting on a computer running Windows or macOS to ensure full Zoom functionality. If you have a Chromebook, learn how to join or start a Zoom meeting using a Chromebook. - When you end or leave the meeting, make sure to exit the Zoom Workplace application fully from the application menu. Click to end the meeting for all. This will ensure that the application does not continue to run on your computer/device, and the recording can be processed.
Videos for Using Zoom
-
- Using host and co-host controls in a meeting
- Zoom Breakout rooms
- Recorded Zoom training (choose from Getting Started with Zoom or Zoom User Training)
- Using Annotation tools on a shared screen or whiteboard
Step 5: Recording a Zoom Meeting Room
Note:
- Cloud recordings are automatically deleted after 120 days. Move Zoom recordings to Kaltura for long-term storage
When you are in your Zoom meeting room, you can use the Record button in the Toolbar to save a copy of the audio and video from that session. You can record Zoom meetings on your computer or to the cloud.

Here’s how to decide where to record your meetings:
- For remote teaching situations or if you do not plan to reuse your recording for future terms, then you can select Record to the Cloud
- Recordings can only be made for students who have access to your class (FERPA)
- Your cloud recording may not be available right away. You will receive an email when it’s done processing.
- You can still download a copy of the recording if you change your mind later
- You don’t need to send the cloud recording to your students. They can access it by going to Zoom and clicking the Cloud Recordings tab
- Note: Cloud recordings are automatically deleted after 120 days.
- If you want to use your recording for the future class as a lecture recording, please select Record on this Computer
- After your meeting is done, make sure you end the meeting for everyone. By default, Zoom will create and point to a folder within Documents/Zoom with the title of the Room that you recorded in. Find the MP4 file and upload the recording to Kaltura.
Step 6: Accessing a Zoom Meeting Room Recording saved to the Cloud
Note:
- Cloud recordings are automatically deleted after 120 days. Move Zoom recordings to Kaltura for long-term storage
Option 1: via Zoom – Cloud Recordings tab
You can also access your recording inside your Brightspace class course.
- Go to your Brightspace course
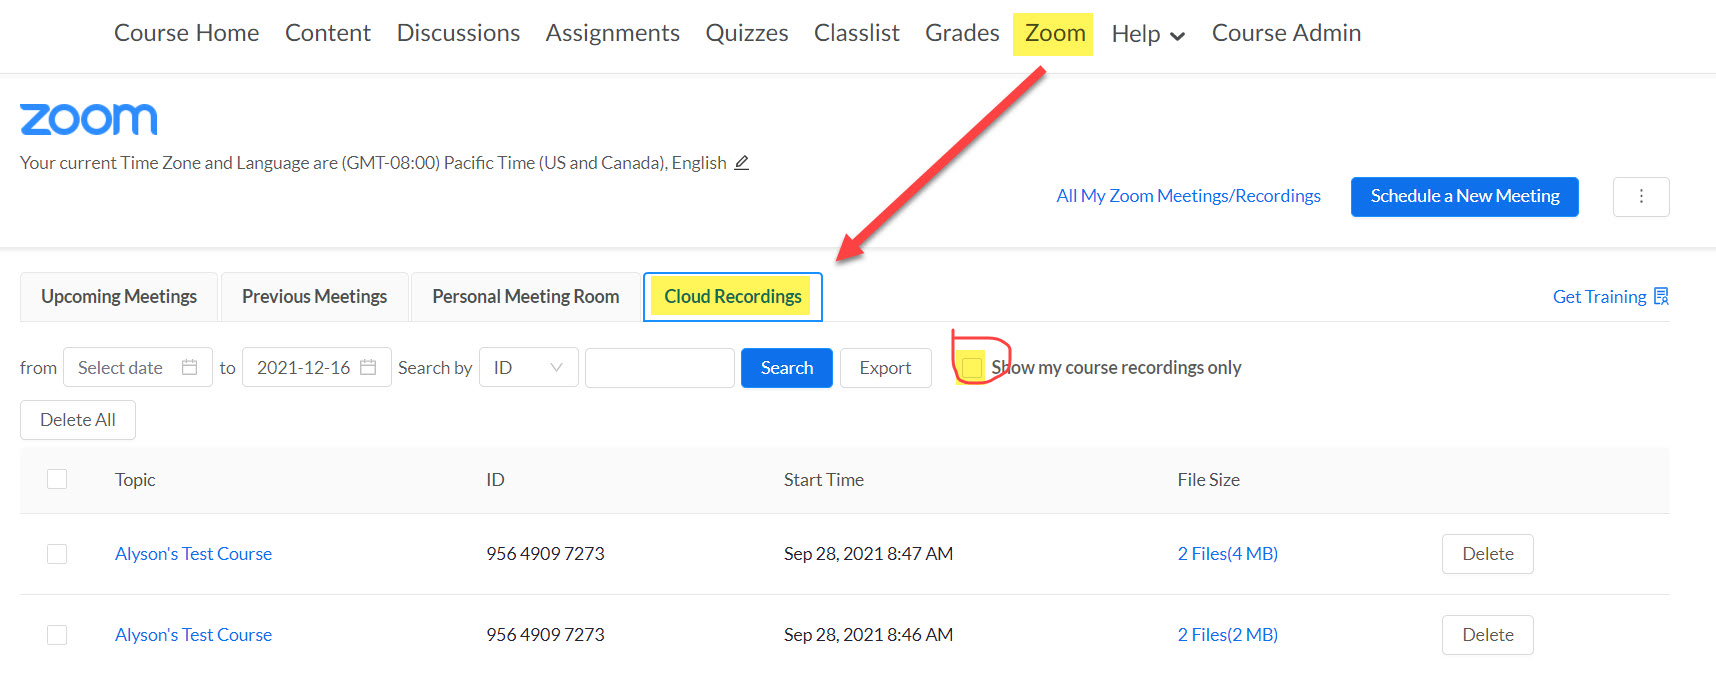
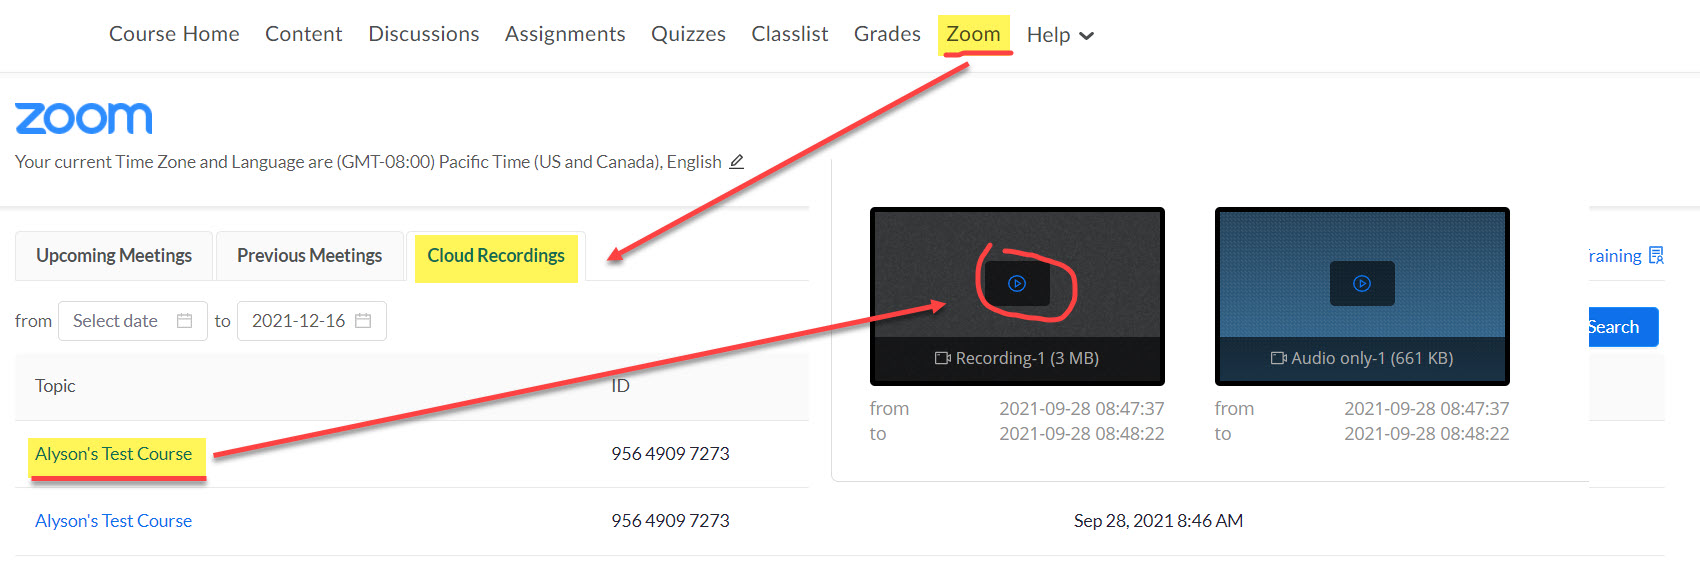
- Click Zoom in the navigation, then click the Cloud Recordings tab. All your class recordings will be listed here
- If you’re recording Zoom for multiple classes, check the box for “Show my course recordings only” to filter your recordings for only this class
- Click on the recording topic link and click on the Play button on the Recording file.
Option 2: via PCC email
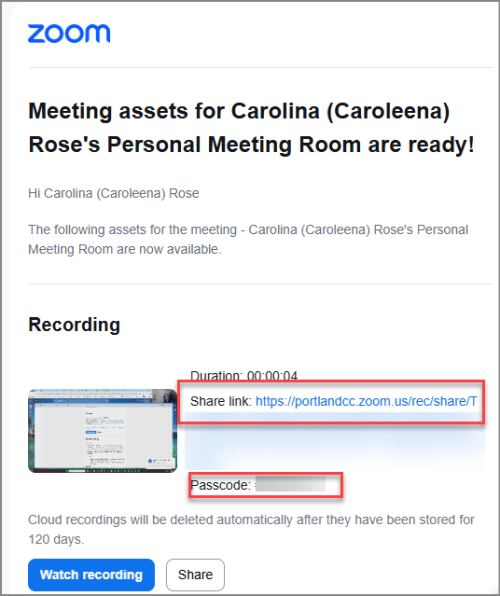
If you recorded your Zoom meeting to the cloud, you will receive an email when your recording is available.
You don’t need to send this to your students as they already have access from inside your class (Zoom, and click the Cloud Recording tab). You can copy the URL next to the “Share link” option if you want to share it with others outside your class.
Option 3: Downloading cloud recordings from the PCC Zoom website
Download the Zoom cloud recording that you created outside of D2L Brightspace Zoom.
Step 7: Share the Recording with your Students
Note:
- Cloud recordings are automatically deleted after 120 days. Move Zoom recordings to Kaltura for long-term storage
Option 1: Students can access cloud recordings from the Brightspace class
You practically don’t really have to do anything but let the students know where to access the recording.
Note: This option is only available if you created your meeting inside your Brightspace class and chose to record to the cloud.
- Click on your Brightspace course and click on Zoom from the navigation
- Click on the Cloud Recordings tab. Students should see all the class recordings that are available to them
- Click on the recording topic link and click on the Play button on the Recording file.
Option 2: Provide recordings in the Course Content
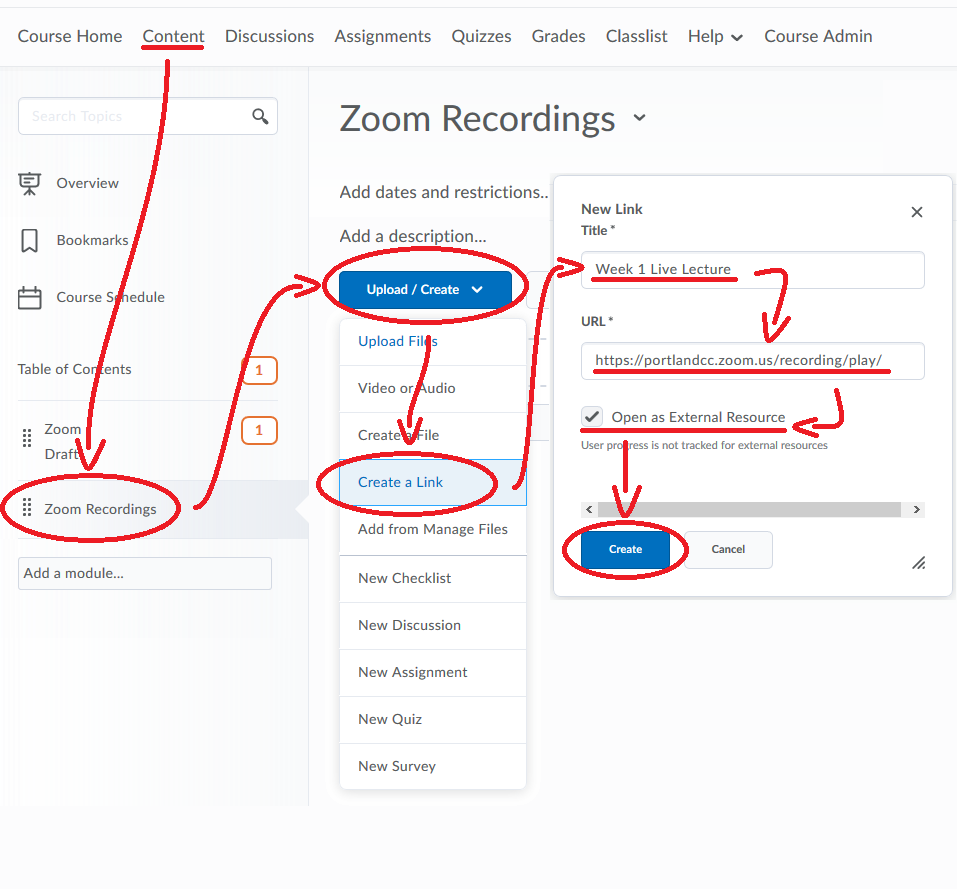
You can also provide the recording link in the Course Content.
- Follow Step 6 of the Kaltura steps if you recorded locally to get the Sharing/Video URL
- Enter your course on D2L Brightspace
- Click on Content
- Create a module, if you haven’t already, where you want to share your Zoom recording with your students (ex. Zoom Recordings)
- Inside the module, click the Upload/Create button and select Create a Link
- Input a title for your Zoom Recording (ex. Week 1 Live Lecture)
- Paste (Ctrl+V or Cmd+V) the Recording URL you received from your PCC email into the URL box
- Click the Create button
Step 8: How the Student/Participant accesses your Zoom Meeting Room
Students/participants will find the link to your Zoom meeting room in one of four ways:
Option 1: Zoom link within course navbar (Course Home)
If you added the Zoom link to your navbar in Step 1, students should be able to access your Zoom Rooms by clicking that link. This is the best and safest router for you and your students. Students entering this way will bypass the password requirement (if you set it up) and list their names in the meeting.
Option 2: Course Calendar widget (Course Home)
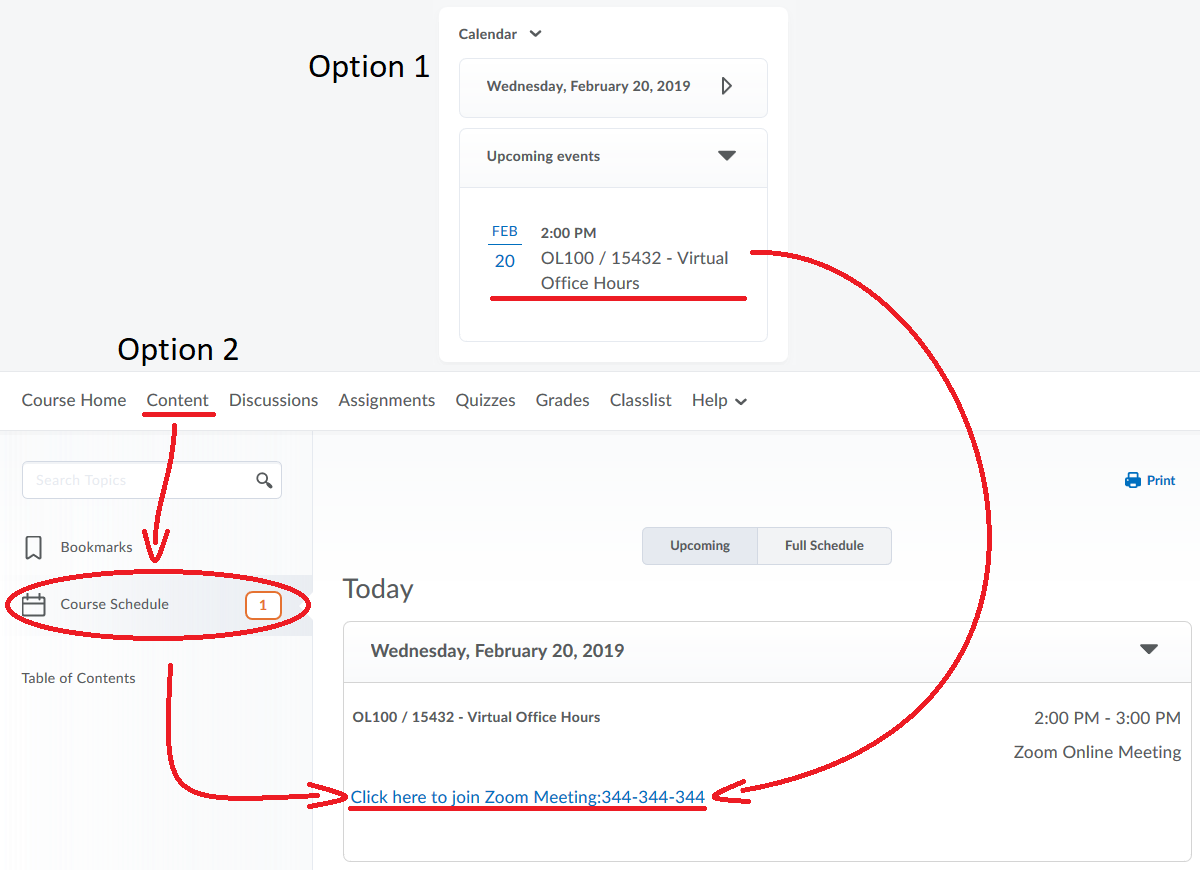
If you set a date and time in the When section of your meeting room, then the Calendar widget on the Course Home page on D2L Brightspace will display an entry for your Zoom meeting room when it is within seven (7) days of the date and time that was set. Students entering this way will open the Zoom app and be asked to enter their name and password (if you set this up). This option is shown in the Student Help Desk video on the Student Participant guide.
Option 3: Course Schedule (Content)
Similar to the option above, Students/Participants will also be able to access your Zoom meeting room at a specific date and time by going to the Course Schedule area within the course Content.
Option 4: Direct URL
If you created the Zoom meeting outside of the D2L course, you can get the direct URL to the room by using the “Invite” button after accessing the meeting room.
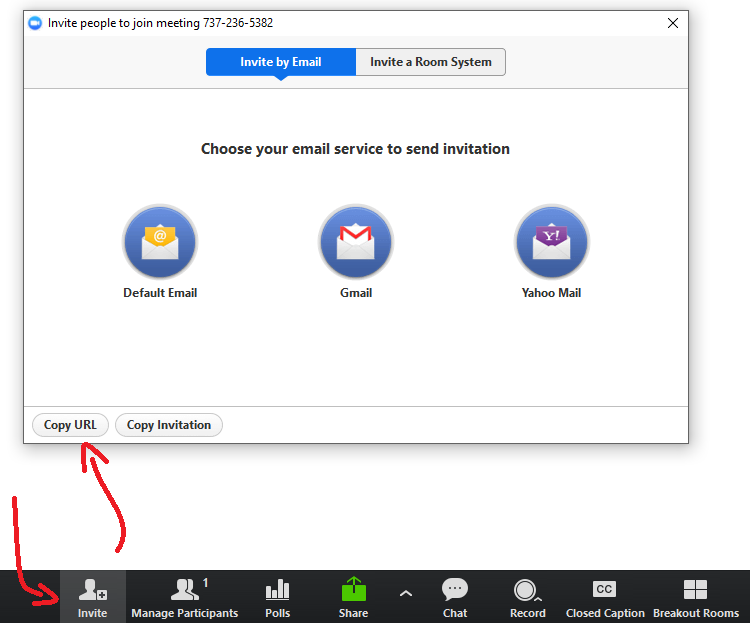
- Enter your Zoom meeting room
- Click Manage Participants to open the Participants window
- Invite
- Click Copy URL
- Paste (Ctrl + V or Cmd + V) the invite URL into the message you are sending to students/participants that you wish to join the room
Step 9: Manage your Zoom meeting (prevent Zoombombing)
Read the tutorial on how to safeguard your Zoom meeting.
Student Group Projects (Student hosts Zoom meeting)
Student will be given a Zoom Basic account and can create their own Zoom meeting to work with their group.
Note: There are limitations to the student account, such as a 40-minute time limit for meetings of more than 2 people, and it can only record to their own computer.
Other Resources
Zoom Resources
- To learn about the various functions of Zoom, check out Zoom-provided videos
- Watch a recorded training session from Zoom; choose either Getting Started with Zoom or Zoom User Training.
- Attend a Zoom live webinar, choose from Getting Started with Zoom or Zoom User Training.
Mobile Devices
While PCC does not support it, you can use mobile devices to access a Zoom session:
Note:
It is recommended that you host the meeting on a computer running Windows or macOS to ensure full Zoom functionality. If you have a Chromebook, learn how to join or start a Zoom meeting using a Chromebook.