Maker Basics: Intro to Laser Cutting
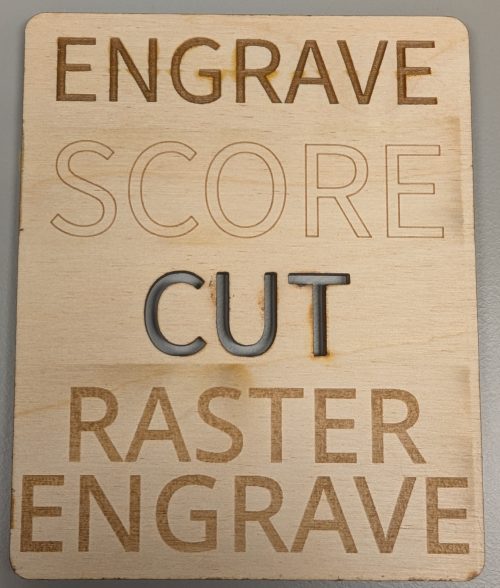
Example of an engrave, score, cut, and raster engrave.
In the the Intro to Laser Cutting Workshop, we introduce makers to the graphic design process of prepare an image for laser cutting and then using our xTool P3 laser cutter to render the image in wood or acrylic. The workshop is often scheduled during the first weeks of any term, but is also available on demand through the year during open lab hours as long as a STEAM Center employee is available.
Location
The Cascade Create Space STEAM Center in Terrell Hall 101 on the Cascade Campus.
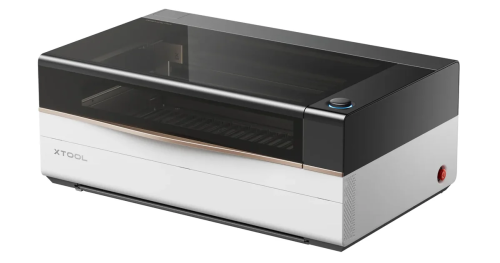
xTool P3 80w Laser Cutter
What to expect
Participants will learn about how to prepare a graphic or image for use in the laser cutter and the specifics of what kinds of processes are possible. The preferred file type for a laser cut is an SVG or scalable vector graphic.
The laser cutter is capable of cutting through many materials in what is called a cut. The xTool P3 laser cutter will cut vector lines along the path of the vectors the way a pen is used to draw lines. A score is essentially a cut that is either or both faster or lower powered, so that it doesn’t cut all the way through. Like the cut, a score follows a vector path. Cuts and scores are the faster forms of effects the laser cutter is capable of.
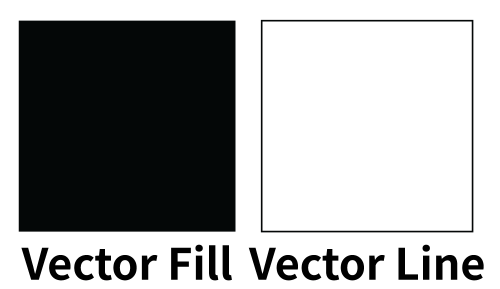
An example of a vector fill and a vector line. By default, the fill is engraved and the line is cut or scored.
An engrave is the process of burning off material in a designated shape that doesn’t cut all the way through. As opposed to a score or a cut, the engraving is burned using a horizontal back and forth motion of the laser head rather than following a vector line. This makes engraving take longer than a cut or a score. In graphic design software such as Adobe Illustrator, an engrave is achieved through a filled in, closed vector shape, as opposed to the vector lines of a cut or score. An engraving will burn the designated shape at roughly the same intensity and speed, though the affect may vary due to material inconsistencies or other factors.
Engraving with a laser cutter involves only two values, one which is engraved or burned off, and one which is not burned off and remains raised in contrast to the engraved area. Sometimes these are referred to as positive or negative space. For this reason, engraving doesn’t typically work well with multi-color images.
Another type of engraving is called the raster engrave. This involves uploading a raster or bitmap image (like a digital photograph) and the xTool Studio software interface will process it similar to a grayscale image as a series of stippled dots with variations in intensity based on the darkness or lightness of various parts of the image. Like the regular engraving, this process can be the most time consuming. Raster engraving is used the least often of all of the possible processes with the laser cutter.
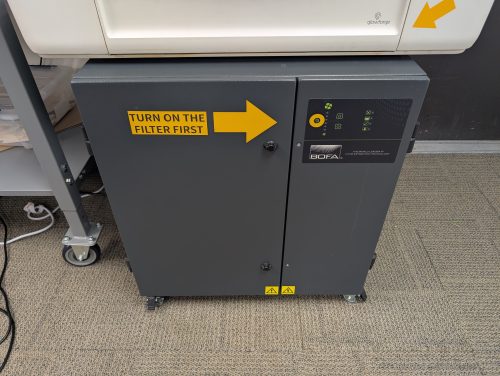
BOFA Filter
Equipment, Materials, and Resources
The workshop will utilize Adobe Illustrator or another graphics editing software to prepare the image for rending on the laser cutter. Then we’ll place our material, usually either 1/8″ birch plywood or 1/8″ acrylic sheets, in the xTool P3 laser cutter. Once the material is loaded in the machine, we’ll use the xTool Studio software for the P3 laser cutter to load the image, enter settings for the speed and power of the laser, position the graphic on the material overlay using the P3’s camera, enter our settings preferences for the speed and power, then start the laser cut. We always turn on the BOFA Air Filtration system located next to the xTool P3 laser cutter in order to safely extract the fumes from the laser cutter and process them through five layers of filtration.
For the laser cutter, the most important safety precaution involves knowing what materials you’re cutting or engraving. Many materials can release toxic gases that you don’t want to breathe, even if filtered through the air filtration unit, so we restrict the use of materials in the laser cutter to known, safe materials, such as laser cutting plywood, acrylic, slate, vegetable tanned full grain leather, thin rubber, and paper. Unsafe or hazardous materials we never laser cut include PVC, pressure treated wood, chrome-tanned leather, polyurethane “faux” leather, polystyrene foam, and fiberglass.
The xTool P3 laser cutter is an 80 watt CO2 laser, which isn’t sufficient to cut through metal, but it can be used to engrave or score the surface of several types of metal, often with a powder coating.
All equipment, materials, and software/websites used in this workshop are available for free in the Create Space STEAM Center. Participants are not required to bring anything other than their interest and curiosity.
Estimated time
The workshop usually takes between 30 and 45 minutes, but possibly longer if there is a large group of makers, lots of questions, or customization desired. Laser cutting projects may take longer to engrave/cut than the workshop itself.
Optional pre-activity
If you want to laser cut a particular graphic design or image, you can bring a copy of your image either by storing it in a cloud service like Google Drive or emailing the file to yourself or on a USB drive. If you’re interested in engraving an image, it’s important to understand the limitation to two values of positive and negative space in the image. If you’re primarily interested in just cutting out a shape, that will be relatively simpler.
Advanced steps
Some advanced aspects of laser cutting can involve experimenting with less common (but confirmed safe) materials, masking to prevent burn scarring the final result surface, or even painting or wood staining your material in advance of laser engraving. Advanced skills involve learning graphic design software such as Adobe Illustrator, Inkscape, or Affinity Designer in order to design graphics specifically for the purpose of rendering them using the laser cutter.