Activity Feed Guide
The Activity Feed can be added to your homepage as a way to engage with your students more frequently, with the opportunity to have a more casual format. It is for posting reminders, fun subject news, and time/course-sensitive updates, and it can also be an easier way to create assignments. We think you’ll find it simpler and more satisfying than the Announcements tool.
- What is required: A D2L course and a custom homepage
Step 1: (If Activity Feed is not currently on your homepage; otherwise proceed to Step 2)
Add activity feed to your homepage
- Go to your course
- Click on Course Admin from the Instructor Tools dropdown in the navbar
- Under Site Setup Click Homepages
- Click the homepage to which you want to add the widget. If you are currently using a custom homepage, click on the name of your custom homepage (it should be blue and have the “active” status).
- In the Widgets section, click Add Widgets
- Search for the Activity Feed Widget and click Add.
- To change a widget’s vertical placement on a panel or move it to another panel, click and drag the widget. Click Save and Close.
Step 2: Creating an activity feed
Once the Activity Feed widget has been added to your homepage, you can create a message or an assignment.
Note: Activity feed “messages” cannot be copied from term to term. Use the ‘Announcements’ tool if you have something that is formal and/or permanent in the course. If you use the Assignment option within the Activity Feed tool and grade the item, the item will be copied to the next class. You can re-link it back to the Activity Feed.
To create a message:
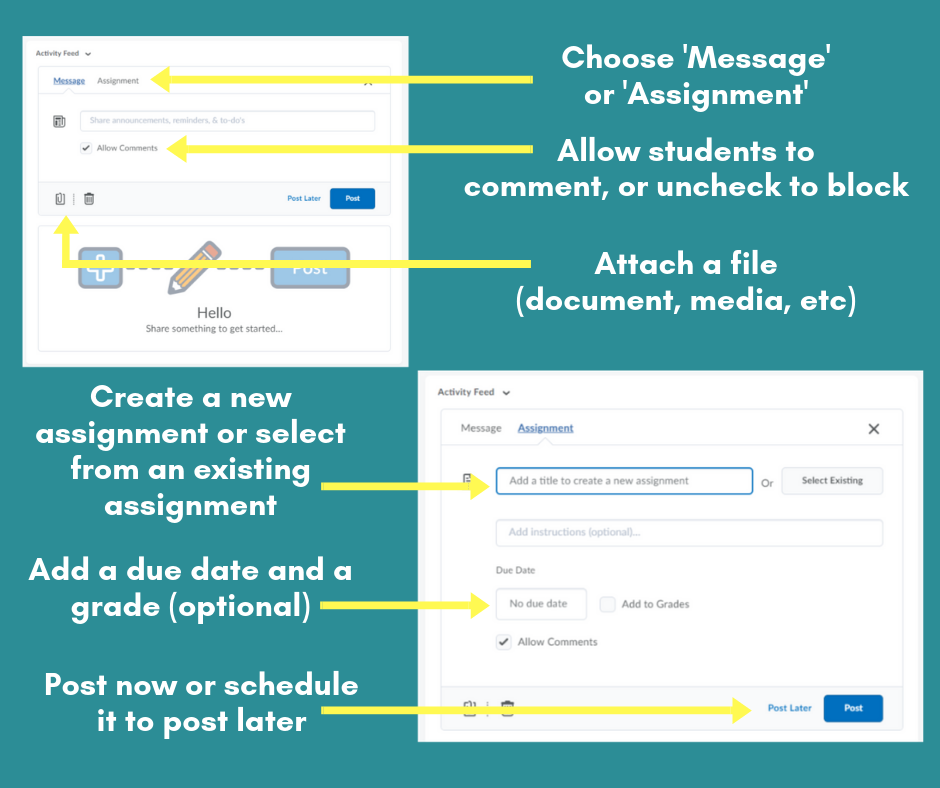
- Select the plus icon (+) from the top left corner of the widget on the homepage. The default selection will be the message option.
- Click on Create Message to enter your information.
- You can choose to attach a file by selecting the paperclip icon from the bottom left corner or to delete the message contents by selecting the trash bin. To collapse the message, refresh your browser page.
- You can choose to allow the students to comment by selecting the ‘Allow Comments’ setting, or deselect it to prevent them from commenting.
- When you are ready to post, choose ‘post later’ to schedule for another time, or ‘Post’ to schedule immediately.
To create (or post an existing) assignment:
- Select the plus icon (+) from the top left corner of the widget on the homepage. The default selection will be message; choose “Assignment instead.”
- You may choose to create a new assignment by typing a title under the “Assignment Name” or you can choose to post an existing assignment by clicking on “Select Existing.”
- If creating a new assignment, you can attach something (bottom left corner paperclip), add a due date, and/or add it to grades.
- Once complete, select to schedule it to ‘post later’ or ‘post’ right away.
Note about assignment settings:
If you need to change settings for the Assignment and the Grade item, go directly to the Assignment or Grades from the navbar.