Calendar
The Calendar tool displays all upcoming events in your course for your students. You can create and manage course events, including recurring events and their corresponding date information (start, due, and end dates). This ensures students can plan and prioritize tasks, leading to better time management.
What is required: What is required: A D2L course
Adjust the Calendar View
Once in the Calendar tool, you can adjust the Calendar view in many ways.
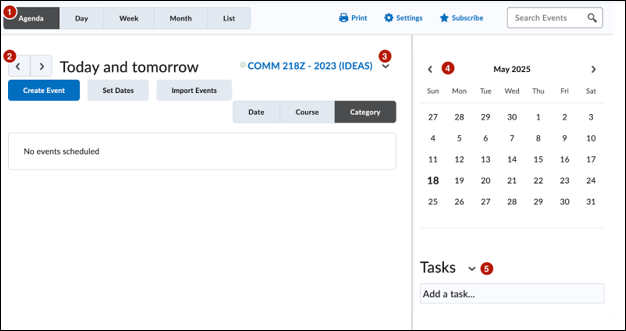
- You can use the Agenda, Day, Week, Month, and List views to see events for your course.
- The Agenda option will show more information about upcoming events with direct links to the part of the course pertaining to the event, i.e., a Discussion Topic or Assignment folder. If you select the Agenda option, you can also sort the displayed events by date, course, or category type.
- The Day, Week, or Month options will limit events displayed based on those timeframes.
- The List option will show a comprehensive list of events for the course in chronological order.
- You can use the left and right arrows in the display area to select a specific date to view.
- You can use the dropdown menu next to the name of the course to select which course to display events for.
- You can use the mini calendar to quickly navigate to a specific day, week, or month. Dates with events will have dot icons displayed underneath.
- You can use the Tasks pane to create, track, and maintain personal tasks
Calendar Events
Using the Calendar Tool, you can create Calendar Events to remind students about upcoming deadlines, office hours, meetings, etc. These calendar events can even be associated (linked) to relevant content in your D2L course.
Calendar Event Common Usages:
- Initial & Reply Posts in Discussion Boards: Since discussion boards do not have traditional due date settings, you can create calendar events to remind students about the initial and reply posts criteria for discussion boards.
- Zoom Meetings: Many instructors use optional meetings or assignments with a meeting component, so you can use calendar events to remind students about these approaching meetings.
Note: If you use the Zoom tab in D2L to create Zoom meetings for your course, calendar events will be automatically generated for those Zoom meeting instances.
- Office Hours: You can create recurring calendar events to remind students about your office hours for your course and even include pertinent contact information, such as your email address, Google Calendar appointment page, and/or virtual meeting details.
- Drop/Withdrawal Deadlines: You can also create calendar events to remind students about upcoming PCC deadlines, such as the term’s drop and withdrawal deadlines.
Ungraded tasks: Many courses use ungraded tasks within a course structure, so you can remind students about ideal timeframes for these tasks and when they should be completed using calendar events.
Create a Calendar Event
You can create one-time or recurring Calendar Events to help students plan for and prioritize tasks for your course.
- On the course homepage, click the drop-down arrow next to the Calendar widget. Look for the word “Calendar” on the right side of the homepage. You may have to scroll down a bit to see it.
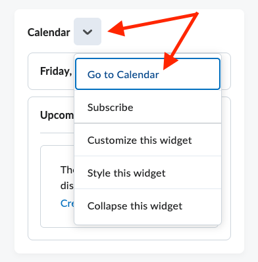
- Select Go to Calendar from the dropdown menu.
- Select the Create Event button.
- Enter the event title in the Title field.
- Enter event details in the Description field.
- Enter the date and time settings under “When”.
- To associate course content with the event, click Add Content. You’ll be asked to select the content from the Content Module it lives within. If you choose to associate content, that content’s name will become the event’s name by default. If you want to create a custom name for your event, select the Use custom name check box to enter a custom name for your event.
- To add group or section participation restrictions to the event, click Add Groups/Sections. You’ll be asked to select the group or section you want to add. You can repeat this process to add multiple groups or sections to the event. You can also add custom restrictions for each group or section.
- To create a recurring calendar event, select Add Recurrences. You’ll be asked to enter additional information about how often you’d like your event to recur.
- To add restrictions to the event, click Add Restriction. You’ll be asked to enter additional information about your event’s visibility settings.
- When finished, select the Create button. Your Calendar Event will be created.
Note: You can add start and end date restrictions to Quizzes, Assignments, Discussions, and other tools, which can then be set to appear in your course calendar.
Delete a Calendar Event in Manage Dates
You can view and easily delete Calendar Events in your course using the Manage Dates table display:
- Click Instructor Tools > Course Admin from the course navbar.
- Select Manage Dates. If the page is set to the “Category” filter, the link will be found under “Site Resources.”
- Under “Filter by Tool,” select Specific Tools.
- Select the checkbox next to Calendar.
- Click Apply Filter. The table display will update to only show Calendar Events in your course.
- Locate a Calendar Event you wish to delete.
- Click the delete icon (trashcan icon) next to the start date for your desired Calendar Event. A confirmation window will appear.
- Click Continue. The selected Calendar Event will be deleted. Repeat as necessary.