Step 5: Entering the Job End Date and Specifying the Approval Queue
The next section is for specifying when the job will end, followed by a section for indicating who will approve and finalize your EPAF.
‘Terminate a Job’ Section
For the “Job End Date”, type in the last day of the job, or you can leave it as the last job end date of the fiscal year (the default).
For the fields that say “Not Overrideable”, remember to leave them as is — they are hardcoded into the system and should not be altered.
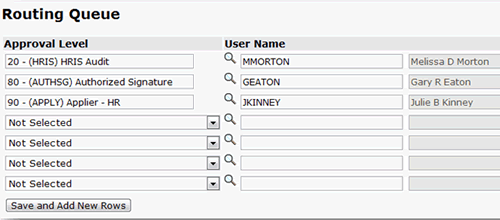
‘Routing Queue’ Section
The Routing Queue section is for specifying who will approve your EPAF. If you have already set up your default routing queue for the Special Projects approval category, you can disregard this section.
Use the ‘Magnifying Glass’ search icon to find the login name associated with the person you’re looking for.
- Type in the Banner login name of your HRIS Specialist on the first line
- Type in the Banner login name of your Managing Supervisor on the second line
- Type in the Banner login name of the Manager of HR systems development (currently Julie Kinney) on the third line
Click SAVE when you’re done.
Comments
You can use the Comments block to explain any details about the job you need to include. All comments go into the Banner form NBAJOBS, where they can be accessed later. Please note that comments will become part of the employee’s permanent Banner EPAF record and cannot be changed.
The Comment block is primarily intended for later stages in the EPAF process — like explaining why your EPAF was not approved, if that happens.
Save and Submit
Whether or not you add a Comment, click the Save button at the bottom of the screen when you’re done.
Next, press the Submit button near the top of the screen.
If submitted successfully, your EPAF now moves to the Approver’s queue for approval.
Errors and Warning Messages
If you received Errors or Warning messages, don’t be alarmed. In many cases these can be disregarded, but some Errors must be addresses before your EPAF is submitted successfully.
Therefore, the next step is to Review Errors and Warning Messages (Step 6 – click ‘Next’ below).