Creating Web Pages in D2L Brightspace
![]() Webpages are the most accessible document type in D2L Brightspace. While PDFs and Word/Google docs have their place in the online classroom, consider whether your document would be more suited as a web (HTML) page. For instance a journal article would probably be best left as a PDF. An assignment template would probably be best left as a Word/Google doc. However, an assignment description or topic notes, for instance, would be well suited as a web (HTML) page.
Webpages are the most accessible document type in D2L Brightspace. While PDFs and Word/Google docs have their place in the online classroom, consider whether your document would be more suited as a web (HTML) page. For instance a journal article would probably be best left as a PDF. An assignment template would probably be best left as a Word/Google doc. However, an assignment description or topic notes, for instance, would be well suited as a web (HTML) page.
Use the PCC stylesheet
A “stylesheet” is a file that webpages in D2L Brightspace reference for various document formatting styles. Titles and section headings have a specific font, size, and color. The font, size and color for normal text and List indents are specified. Image margins are added so that when you wrap text around an image it doesn’t run right up against the image. Tables have alternating colors and hyperlinks are colored blue.
Check the following elements and ensure they are accessible
For each item that you have in your document, click on the accessibility guideline(s) that corresponds to it in order to learn how to make the element accessible.
Headings
Headings need to be labeled specifically as a “Heading.”
While enlarging the font size of Heading text will cue sighted students, students using screen readers would have no way of distinguishing this text from the surrounding paragraph text. Labeling the text as a Heading, allows screen reader users to navigate the document by section, instead of having to start reading from the beginning every time (much like bookmarks in a PDF).
There is a very nice time-saving aspect of labeling text as headings. When you use the PCC stylesheet, and you select the appropriate heading level, the formatting is done for you automatically! One click and done!
In the D2L HTML Editor, simple select the text you want to be a Heading. Go to the toolbar and select the proper heading from the formatting drop down menu.
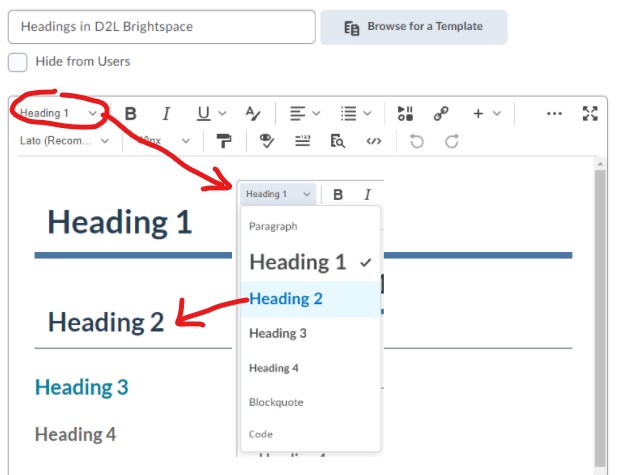
Note that headings also need to be used in the correct order. Headings chunk out your content, making it easier for everyone to read. Headings must be used in the correct order for them to be useful. Do not skip heading levels.
- Heading 1 is the title of the page. There is only one Heading 1 per page.
- Heading 2 is the major section headings (much like the chapters of a book).
- Heading 3 is a subsection of Heading 2
- Heading 4 is a subsection of Heading 3
- Heading 5 is a subsection of Heading 4
- Heading 6 is a subsection of Heading 5
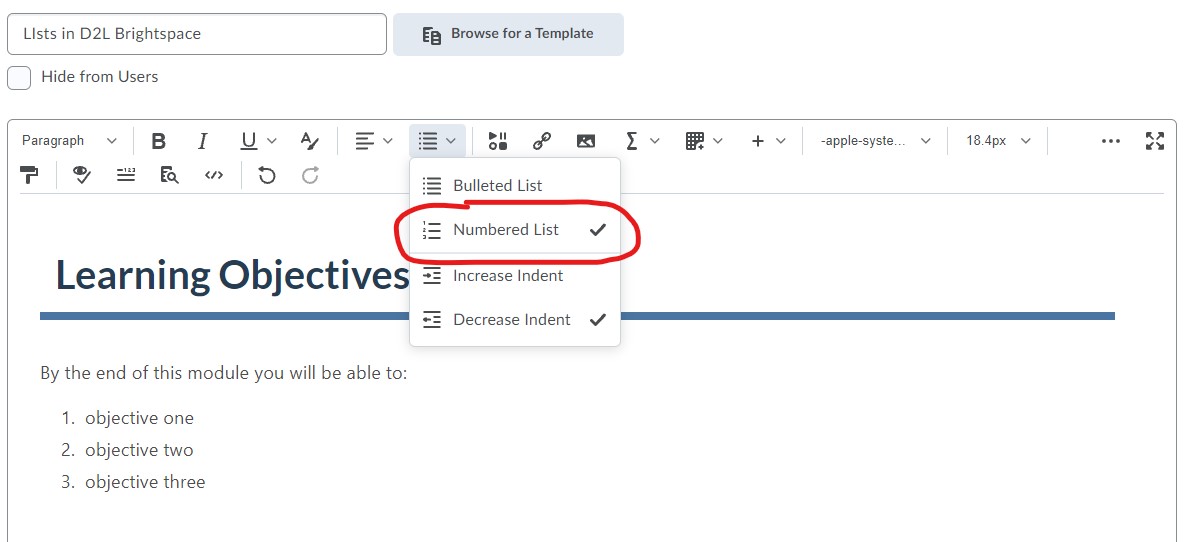
Lists
Lists need to be formatted using the list tool
When a list is formatted using the list tool in the D2L HTML editor, screen readers will identify that their is a list of…let’s say… 5 items. If the text is not formatted using this tool, a screen reader will read it as if it were sentences on a page and the context will not be conveyed to the student.
- Select/highlight the content you want to make into a list.
- Then on the D2L HTML editor toolbar, click on the Bulleted List icon if you want a bulleted list or select Numbered List from the drop-down menu if the order does matter.
Tables
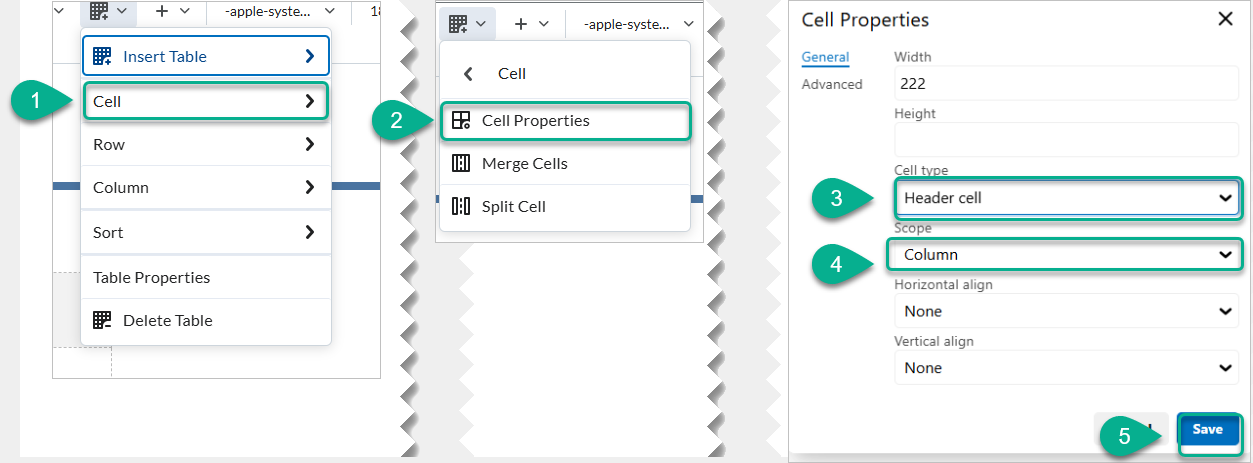
Create data tables with column or row headers
Designating column and row headers in a table is essential; otherwise, the table’s layout will be in accessible to screen readers.
- Put your cursor in one of the cells you want to mark up as a table header or row, then click on the drop-down menu next to the Table icon in the toolbar.
- Choose Cell Properties. The Cell properties window will pop-up.
- In the Cell type field, click on the drop-down list and select Header cell.
- If the Header Cell is for a column, select Column from the Scope menu–and if the header cell is for a row, seclect Row from Scope menu.
- Click Save. You will know you have successfully changed the column or row to table headers because the look of the table cells will change.
Repeat for each cell that is a column or row header.
Ensure proper reading order in tables
Screen readers read tables from left to right, top to bottom, one cell at a time (no repeats). If cells are split or merged, the reading order can be thrown off.
Read your table left to right, top to bottom (never repeating a cell). Does it make sense? A screen reader reads tables in this way.
Merged, nested, and split cells change the reading order of tables. Make sure you construct your table in a way that accommodates good reading order.
Images
Provide alternative text descriptions (ALT text) for images and shapes
Alternative text descriptions of images (ALT text) allows screen reader users to benefit from the information being conveyed by an image. For images that cannot be adequately described in one or two brief sentences of alt text, see the Accessibility of Complex Images web page.
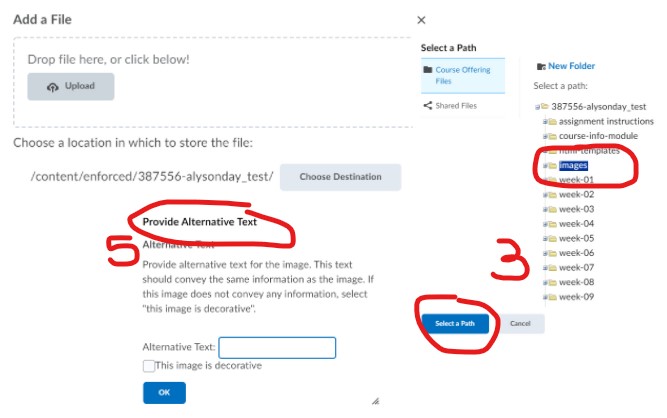
- Place the cursor where you want to insert an image, and click the Insert image icon from the toolbar.
- Select whether to add the image from your computer, your course offering files, or a URL.
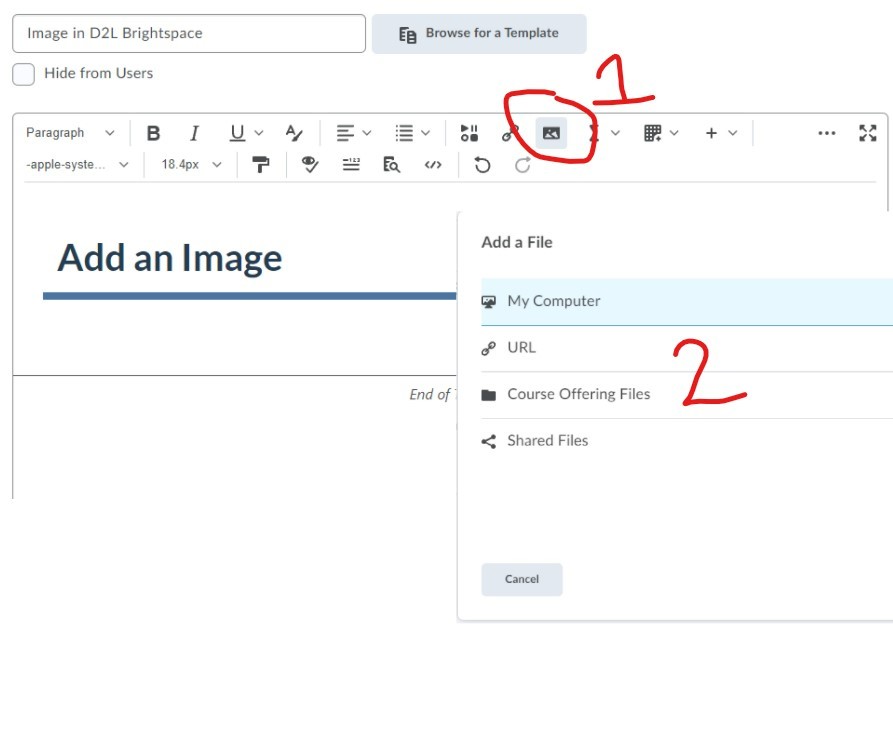
- Navigate to where the image is, select the image file, and click the Open button. If using a URL, enter in the web address of the image.
- (Optional) If you would like to organize your files, click the Choose Destination button, select the images folder, and click Select a Path button. This will store your image inside the images folder. If you don’t have an images folder, you can create one by clicking on the New Folder link.
- Click the Add button
- The Provide Alternate Text window will open. Type in descriptive text for the image. For example: “Penguins on an iceberg in the South Pole”. It’s important to write a description that conveys the content and the purpose of the image. If the image is for decorative purposes, just check The image is decorative box instead.
- Click the OK button, and then the Done button to save.
Hyperlinks
Meaningful link text
Links are a major method of navigating for everyone, but especially screen reader users. If the links are titled with meaningful text, they are much more useful.
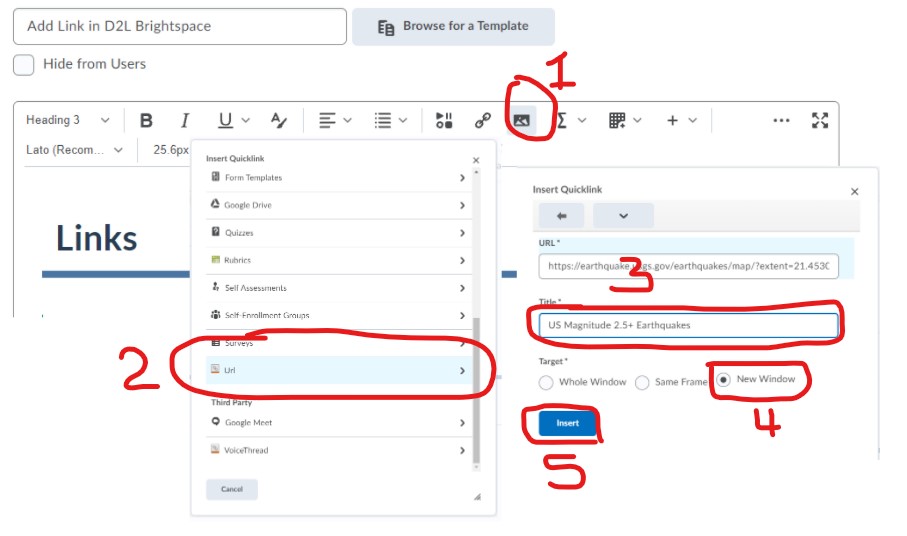
- From the toolbar, click on the Insert Quicklink icon.
- You can add links from within the course or from an external website (URL option).
- Enter a meaningful title for the link. For instance, if you are linking to an article, the title of the link could be the title of the article.
- Select the radio button for “New Window.”
- This ensures that the link opens in a new tab and the student is not taken out of the online classroom.
- Click the Insert button.
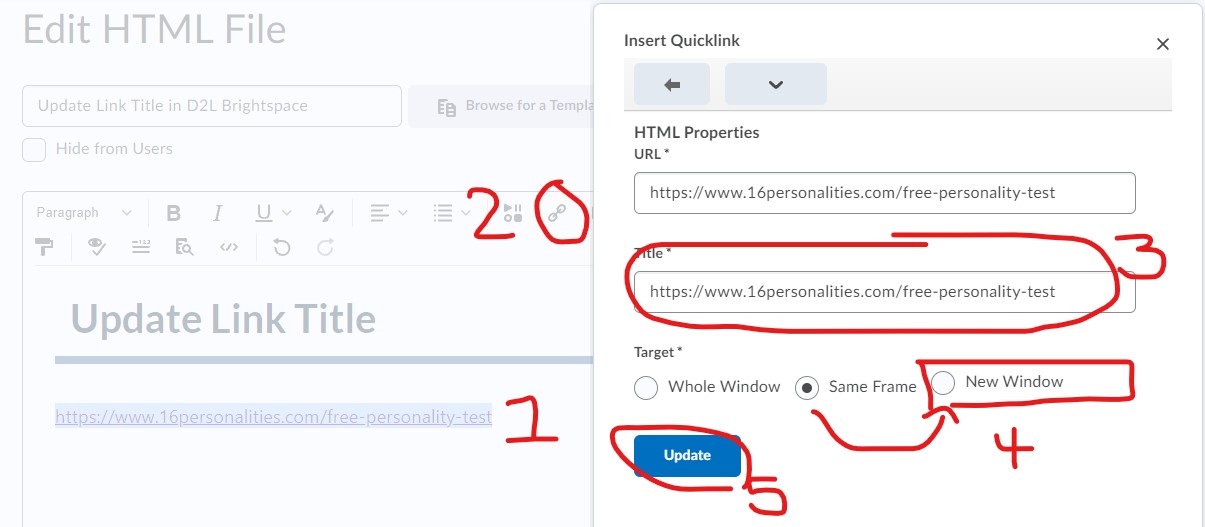
Editing an existing link to add a meaningful title
- Place your cursor inside the URL.
- Click on the Quicklink button from the toolbar.
- Change the title from the web address to something meaningful.
- Select the radio button next to “New Window.”
- Click Update.
Equations/Notation
Mathematical Equations, Formulas, and Notation
For screen readers to read mathematical and scientific notation, MathML must be used. There are two straightforward ways to ensure your equations, formulas, and notation are read correctly in D2L Brightspace, the Insert symbol tool and the Equation Editor tool.
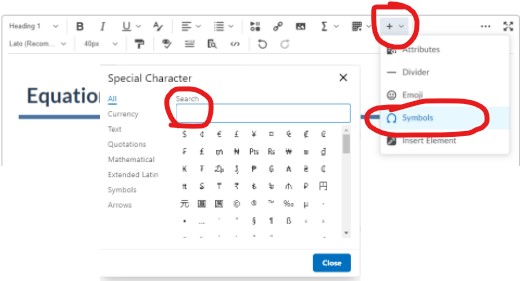
Insert Symbol
Let’s take a simple math problem like 2 minus 1 equals 1. If you used just your Keyboard to enter “2-1=1,” a screen reader would read it as 2 dash 1 equals 1. Now a screen reader user is left wondering what is meant by the “dash.” In this case if you used the Insert Symbol tool, you can search for and select the symbol “minus” instead of using the “dash.”
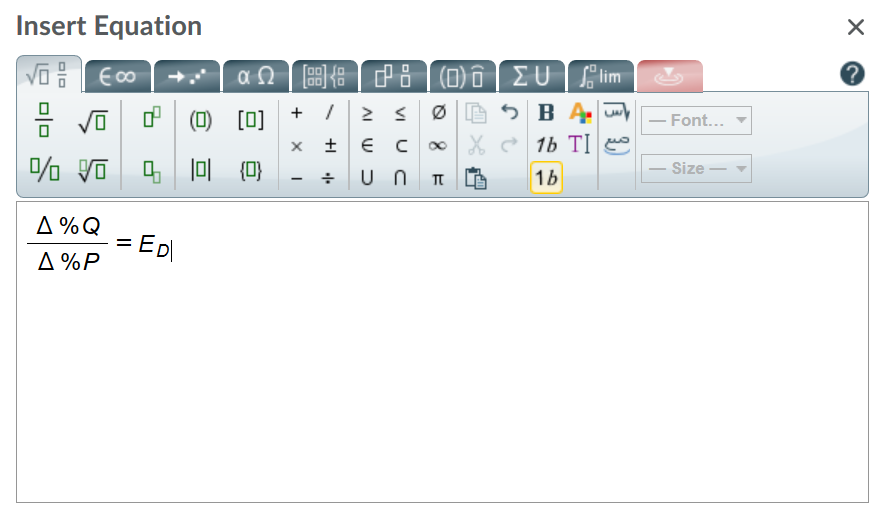
Equation Editor
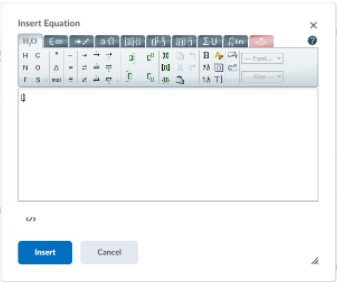
The Insert Symbol tool is great for very simple math and notation. But if you are using more complex formulas and equations, you need to use the equation editor. This tool allows you to use graphical, MathML, LaTeX, or Chemistry input.

If you know MathML or LaTex language then using one of these editors may be faster for you. However, if you are not familiar with those languages, then the graphical equation editor is for you! Just select the mathematical format that you need and enter your values.
In the latest (August 2021) update of the Brightspace HTML editor, a Chemistry equation editor was added. We haven’t tested it much, so if you use it a lot we welcome your feedback!
Color
Don’t use color alone to convey meaning
Don’t use color alone to make a distinction, a comparison or to set something off or apart from the rest of the web page. If you categorize something by color alone, those who are color blind or blind will not benefit from the color distinction.
Use sufficient color contrast
If you print your color graphic on a black and white printer, would it be understandable? Without sufficient color contrast, people who are color blind will not be able to benefit from the information.
To check color contrast with D2L’s color tool:
- Go to the module and click on the page you want to check the color contrast.
- Select the text that you want to change to another color and click the drop down menu next to the Color icon in the toolbar.
- Note: When picking a color for your text in D2L Brightspace, make sure you choose a color that registers with a green checkmark in the Select a Color window.

- Note: When picking a color for your text in D2L Brightspace, make sure you choose a color that registers with a green checkmark in the Select a Color window.
- Select the color and click the Save button.
Recorded workshop
- Video: How to Make Your D2L Content Page Accessible and Stylish: Have you ever wondered how to respond to a less-than-perfect Accessibility Score on a D2L course webpage? If so, this training session will not only answer that question, but also how to design student-centered module structures, use up-to-date HTML templates to create stylish content, and convert Word files, PDFs, PowerPoint slides, and Google Docs into course webpages with perfect accessibility scores.
- HTMLG – An online HTML editor, converter, and cleaner. Use it to convert Word docs to html code
- Convert Markdown to HTML
- Video: Heading structures and font sizes overview (6:02)
- Video: Addendum to Stylish Workshop (3:51) (changing the default font)
- Please note: The default paragraph-level font for the most up-to-date Templates in the 2024 Public Files folder is Lato 19. If the HTML has properly aligned with the Template’s CSS Stylesheet, you do not need to manually adjust the size of the paragraph-level text: It will be automatically set for Lato 19. Older Templates will display -apple-system… 18.4px as the paragraph-level default.
Accessibility Checker in D2L Brightspace
You have these options to improve the accessibility of your content pages in Brightspace:
updated 11/3/2025