Create an EPAF – Step 4
Entering details about the job
On the top section of this screen you will see a verification of information you typed in earlier screens.
In the New Hourly CE/SE Job Section below it, type in the ORG code (“Timesheet Orgn”) associated with the job you are creating. (The Timesheet ORG code is the code associated with your department’s budget.)
If you don’t know the ORG code, click on the magnifying glass icon and select the ORG that goes with your department.
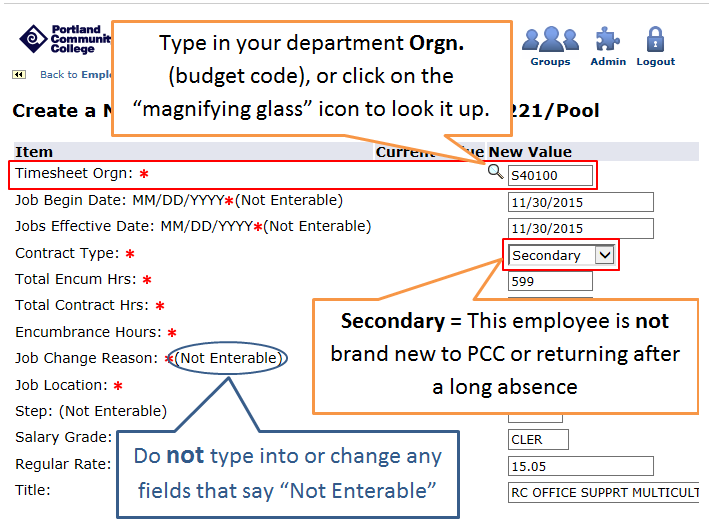
(You can include the “%” sign as a wildcard in your ORG. Code search.)
The “Job Begin” and “Jobs Effective” dates, and all other fields that say “Not Enterable” in parentheses, should NOT entered or changed — this information is carried over from an earlier screen.
Entering the hours
You can change the Total Encumbered Hours to something less than the default maximum number of hours allowable, but make sure the three “hours” fields are identical:
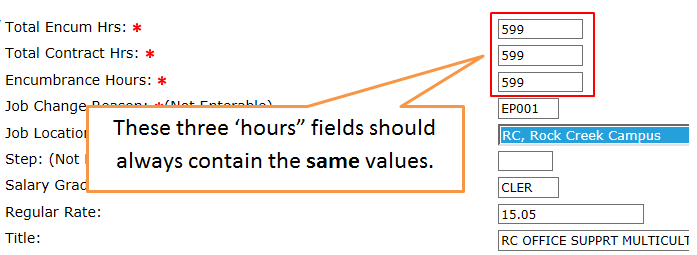
These number should represent the maximum authorized hours to be worked for the fiscal year.
Other fields
Here’s what to type for the other fields:
| Field | Description |
|---|---|
| Contract Type | Select “Secondary” for the contract type, unless the employee is brand new to PCC (in any department), or if they are returning after a long absence and you had to “reactivate” them in earlier steps (choose “Primary” instead in these cases). |
| Job Location | Use the drop-down menu to select the primary location for this job. |
| Salary Grade |
The Salary Grade needs to be entered only if you are creating a Casual EPAF. Type in one of the following values in CAPS. The most common is “CLER.”
For more information, refer to the Salary Schedule (located on the HR Compensation webpage) for the type of casual job you are originating. |
| Step |
The Step needs to be entered only if you are creating a Student EPAF. Steps are: 1, 2, 3. Refer to the Salary Schedule for more information. |
| Regular Rate |
The Regular Rate needs to be entered only if you are creating a Casual EPAF. Based on the Salary Grade, type in the hourly pay rate for this employee. For more information, refer to the Salary Schedule link (located on the HR Compensation webpage) for the type of job you are originating. |
| Title | Type in the Job Title, such as “RC WRC OFFICE ASST” or “SE LINKS TUTOR ESOL” (all caps). |
Again, fields that say “Not Enterable” in parentheses cannot be changed and do not have to be entered.
The next section is for specifying the Job End Date (“End Job”) and who will approve your EPAF.