Create an EPAF – Setting Up Your EPAF Approval Queue
Before you create an EPAF, you may want to set up your default Approval Queue (also called the ‘Routing Queue’). This is a list of managers who will be approving and finalizing your EPAFs. Once you set this up, you won’t have to indicate who approves your documents each time you create a new EPAF, since it will automatically appear as your default routing queue.
Only authorized managers are allowed to serve as approvers.
From the “Employee Services” tab of MyPCC’s BanWeb:
Click on Electronic Personnel Action Forms:
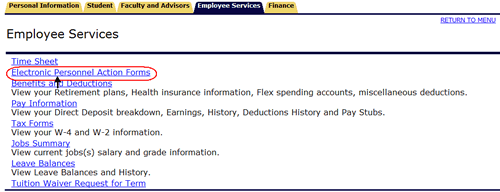
Click on “EPAF Originator Summary.”
Click on the link “Default Routing Queue“, located in the lower portion of your screen:
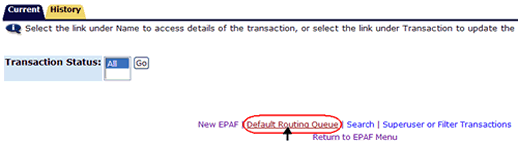
Specify the Approval Category for the default routing (approval) queue you want to create, using the drop-down list. (Is it for a Casual, Student, or another EPAF type?)
Click the Go button.
Specify the PCC employees who will be approving (or not approving) your EPAFs.
On the first line (“20 – HRIS Audit”), click on the “magnifying glass” icon to look up and select your HR representative’s login name.
On the second line (“80 – AUTHSG), click on the “magnifying glass” icon to look up and select your supervising manager.
On the third line (“90 – APPLY – applier”), click on the “magnifying glass” icon to look up and select the Manager of HR Systems Development (currently Julie Kinney).
You can also set someone up as an “FYI” — someone who can review EPAFs and acknowledge that they are correct but not approve them. Use one of the extra lines provided to set up an FYI, making sure to choose “FYI” as the Approval Level and Required Action.
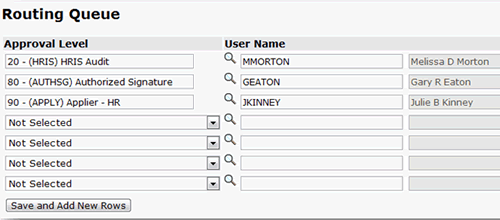
Press Save when you are finished.
Now each time you create an EPAF, the details of this routing (approval) queue will appear as you have indicated.